Tuesday, March 31, 2020

Iomega StorCenter ix4-200d tricks

This thing is old, but seems to work ok for me in the situation I use it in, specifically for me, I wanted something that used iSCSI as the connection, and this did the trick.

Here's some things I've collected on it that might help you out.

svcd process hogging

I wish I knew about this fix when I first bought this thing.  This fixed a problem that I always had with this unit.  The GUI was just stupid slow.  After the fix below, it was night and day difference in GUI performance.  I don't know what this process does exactly, but the fix below that I found on by user 5p0ng3b0b really made an improvement.  This also increased my transfers from around 5.5MB (big M big B) / sec to 6.5MB, which isn't huge, but that's around 15% increase?

https://forums.lenovo.com/t5/LenovoEMC-Storage/what-is-svcd-process-it-s-causing-high-cpu-usage-and-slow-file-transfter-speed/m-p/2157713

SSH to your Device (instructions how to enable SSH below)

create a file "fixsvcd.sh" (bash file) and paste in the contents below.  You need to use this script to edit because the file itself is in a read-only file system.  This script will all you to edit the file (when its run it will bring up nano to allow you to make the changes)

#!/bin/sh
mknod -m0660 /dev/loop3 b 7 3
chown root.disk /dev/loop3
mkdir -p /tmp/apps
mount -o loop /boot/images/apps /tmp/apps
nano /tmp/apps/usr/local/cfg/sohoProcs.xml
sleep 1
umount /tmp/apps
sleep 1
if [ "$(mount | grep -c /tmp/apps)" = "0" ]; then
    rm -f /dev/loop3
    rm -rf /tmp/apps
fi

Save the file.

Now make it executable
chmod 777 fixsvcd.sh

now run the script
./fixsvcd.sh

"Nano" editor will run and show you a bunch of data"

Press CTRL W   -search for " svcd "

Now make the change to the file adding the entry Nice="19" entry into the statement below
<Program Disable="0" Name="svcd" Path="/usr/local/svcd/svcd">
        <SysOption MaxMem="96M" Nice="19" Restart="-1"/>

Press CTRL + 0 (save) and then press ENTER

Press CTRL + X (exit)

Now reboot the unit.
GUI is incredible faster for me after the restart.

How to enable SSH on your IX4-200d


This will allow you to SSH to your system

Use this URL (put in your IP of your device)
https://IPofStorCenter/diagnostics.html

Click on "Allow remote access.."

Then click on apply.

Now you can logon via SSH using the creds:

login: root

password= sohoYOURPASSWORD   (you prepend "soho" to your password that you would use to logon to your device.


RESET LOST ADMIN PASSWORD 

Just hold down the reset button on the back for 5 seconds.  This will cause the unit to reset the password and network settings.  No data loss.
Once reset, you can HTTP to it and setup security again, including a new password

Saturday, March 28, 2020

SCP commands

Syntax:
scp <source> <destination>

To copy a file from B to A while logged into B:

scp /path/to/file username@a:/path/to/destination

To copy a file from B to A while logged into A:

scp username@b:/path/to/file /path/to/destination

Here's an example.  Run this from B to pull data from A. 
This one shows it using port 2223 for the SSH session

scp -P2223 root@192.168.3.11:/mnt/videos/* /volume1/movies/

Activate SMBv1 in Windows 10

How to fix the
"You can't connect to the file share because it's not secure"
message in Windows 10 while mapping network share

You can enable the SMBv1 Protocol by following these steps

Open Control Panel -> Programs -> "Turn Windows features on and off"

Expand the SMB 1.0/CIFS File Sharing Support option


Check the SMB 1.0/CIFS Client option


Click the OK button.
Click the Restart now button.


Tuesday, March 24, 2020

How to send CTRL ALT DEL to a nested RDP

Are you RDP'd into a Windows box, then RDP from that box into another and you want to send a CTRL ALT DELETE?

Its like being in some kind of "Inseption" situation!

Here's a trick I use.

On the machine you want to receive the CTRL ALT DELETE bring up the On Screen Keyboard.

On your local computer keyboard, press CTRL & ALT.  You should see the remote OSK corresponding keys go blue.  Then, with your mouse, press "DEL" on the on screen keyboard.

There ya go!


Monday, March 23, 2020

Windows 10 application sound level adjustment

You can tune the audio level of each application running in Windows 10.

This is very handy if you need to share the computer audio to a meeting sharing application like ZOOM meetings.  When you are sharing the system sound to these meetings, its difficult to adjust it.  You can use this method.  For example, sharing a Steam Game on Zoom.us.  The system level can be very loud, and the volume control won't usually alter it.. 
You can customize the level going out the broadcast, keeping the game level lower, but allowing your headset volume to be at a comfortable level, while the sound leaving your speakers relatively untouched in many cases.

You can get two it one of these 2 ways

Search for "sound mixer options" in Windows 10 you can get to it

or
  1. Right click on your volume on the task bar
  2. Select "Open Sound settings"
  3. scroll down to Advanced sound options


Now you can assign the level of the applications


Saturday, March 21, 2020

Issabel Trunk Balancing in asterisk

Issabel distribution of Asterisk as a feature called Trunk Balance


This is a work in progress but you can use it in this methodology

Trunk balance lets you load balance across multiple trunks.  It also allows you to limit time usage on a trunk and values in SQL servers.

This example will balance "evenly' across 2 trunks, "Trunk1" and "Trunk2"
Go into TRUNK BALANCE

(Some unused options in the screen capture below were removed to show only settings for this example)

Trunk Description: "TrunkBalanceTest1"
Trunk Destination:  Your first trunk that you want to send calls.  In my example "Trunk1"

LOAD RATIO:  This is the ratio of calls this trunk should accept.  If you wanted 1/3 of the calls to go through this trunk, you would put a "3'" for 1/3.  This means the trunk would accept 1 out of 3 calls that are sent to it.

This example uses 2 trunks, I will put in a "2" in this to ensure this trunk gets 1/2 the calls.

IMPORTANT:
Your total here for all( ENABLE) TRUNKS must = 100% (at least)
IF you DISABLE a trunk, you MUST alter the ratio on the other trunks to ensure it equals to 100% at least.

Example:  If you have two trunks with 1/2 calls on each, and you DISABLE a trunk, you must change the value of the remaining active trunk for a "2" to a "1" to ensure the remaining trunk gets all the calls, else it will give 1/2 the calls busy signals!

Testing has shown that putting a value of "1" in the last trunk will ensure it always answers all remaining calls that it receives.

press SUBMIT CHANGES

Now Create a second balance trunk

Trunk Description: "TrunkBalanceTest2"
Trunk Destination:  Your first trunk that you want to send calls.  In my example "Trunk2"
LOAD ration = 2

press SUBMIT CHANGES

Now, go to your outbound routes that you want to use these trunks on.

Put your Trunk balance entries into your outbound routes that you want to use these


Submit your changes

Apply your settings.

Make some test calls!  It won't be exactly 50/50 split, but it will average out over time.

This example below is testing to the external number 7020

[2020-03-21 22:34:31] VERBOSE[65441][C-00000122] res_agi.c:     -- trunkbalance.php,5,7020: This trunk TrunkBalanceTest2 is balanced. Evaluating rules
[2020-03-21 22:34:37] VERBOSE[65452][C-00000123] res_agi.c:     -- trunkbalance.php,4,7020: This trunk TrunkBalanceTest1 is balanced. Evaluating rules
[2020-03-21 22:34:43] VERBOSE[65459][C-00000124] res_agi.c:     -- trunkbalance.php,4,7020: This trunk TrunkBalanceTest1 is balanced. Evaluating rules
[2020-03-21 22:34:48] VERBOSE[65466][C-00000125] res_agi.c:     -- trunkbalance.php,4,7020: This trunk TrunkBalanceTest2 is balanced. Evaluating rules
[2020-03-21 22:34:55] VERBOSE[65473][C-00000126] res_agi.c:     -- trunkbalance.php,4,7020: This trunk TrunkBalanceTest1 is balanced. Evaluating rules


Connect a wire only device to a wireless only network

Need to work from home?  Maybe you need to use a wired only VOIP hardset but have no access, or reasonable access to run a wire to the router?

Here's a possible option for you using Windows 10 Internet Connection Sharing to connect a wired device(s) via an unused Ethernet port.


(Too Long Didn't Read)You can connect to the WiFi using your windows 10 machine, select internet connection sharing, share it to the Ethernet port and use that to plug in your phone, or devices.  Remeber that you will need a way to power your IP phone. 


DETAILS
First connect to your WiFi on your computer


Bring up your network connection list

Press the Windows key and the R key at the same time to open the Run box. Type ncpa.cpl and hit Enter and you can access Network Connections directly.

OR


then


Now you'll see something like this
In this example, you see a connection to the WiFi network "MyWifiNetwork" and an unconnected wired internet connection.


Right click on the WiFi link, select PROPERTIES


Select the "SHARING" tab


Select Allow other network users....
Click on the "Home networking connection" drop box
Select the name of the Ethernet connection of your computer
Select OK


You'll now see a "SHARED" text by your wireless connection

Now connect an Ethernet cable from your computer to the device you want to connect to your internet connection.  Power on the device.  It should now have internet access.

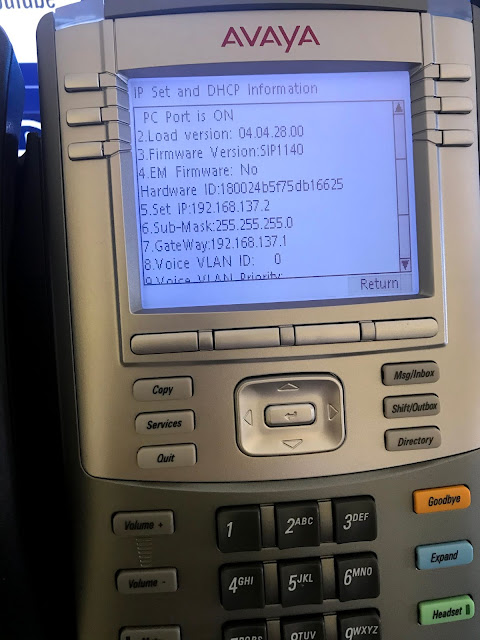
The device will get an IP address of 192.168.137.X

Here's a shot of a VoIP hardset connected to the internet via a laptops wireless connection having received an ip of 192.168.137.2


Yes, you can hook up an Ethernet switch to this connection and connect multiple devices.  Even an additional WiFi node to give more WiFi coverage to an area.

ADVANCED

Its also possible, should the unlikely requirement be to alter this network address.

  1. Open a CMD prompt "AS ADMINISTRATOR"
  2. Enter REGEDIT and press enter key
  3. Select YES/OK to continue through the security warning dialog box
  4. On the Registry Editor window, on the left pane, go to HKEY_LOCAL_MACHINE\System\CurrentControlSet\Services\SharedAccess\Parameters
  5. In the Parameters right pane, double-click ScopeAddress then StandaloneDHCPAddress
  6. In the Edit String box, modify the IP address range of your choice in the Value data field
  7. Once done, click OK to close the box
  8. Close the Registry Editor window
  9. Restart the computer
VPN ACCOUNT

IT MAY
be possible for you to share a VPN account with the similar methodology.  This would really depend on your VPN system used.  


In this example, the logged in VPN account shows as an ethernet port. Its been shared to "Ethernet" port that has a VOIP hardset connected to it.


Monday, March 16, 2020

Rogers SIP connection on Asterisk

Rogers Business SIP service (Canada) to asterisk (FreePBX Distro/ Centos7)
Also a method of using multiple NICS on a single linux box for asterisk

Here's what I did to get Rogers Dedicated business SIP service connected to Asterisk

Their service is pretty straight forward to connect.  We had a dedicated router dropped in, we plugged the Ethernet connection into our PBX.

Here's an example of an asterisk PBX.  
ETH0 is connected to your local LAN (and Internet) and default gateway
ETH1 is connected to the Rogers router, and configured with their designated internal 10.0.30.0/29 address

They are going to give you a private IP to configure on your SBC/network/PBX

The PRIVATE side IP they gave me to use was:

Rogers IP: 10.0.30.137 / 29
Company IP: 10.0.30.138 - 10.0.30.142/29

Their SIP gateways were 

173.46.30.202

My example, i'm connecting their private circuit directly to my asterisk PBX on its own Ethernet port ETH1

My PBX was established already with ETH0 already assigned to 10.1.100.59
So the config looks like this for my PBX.

[root@pbx-07 ~]# cat /etc/sysconfig/network-scripts/ifcfg-eth0
DEVICE="eth0"
BOOTPROTO="static"
BROADCAST="10.1.100.255"
DNS1="10.1.100.80"
GATEWAY="10.1.100.1"
HWADDR="00:15:1D:06:08:1F"
IPADDR="10.1.100.59"
NETMASK="255.255.255.0"
NM_CONTROLLED="yes"
ONBOOT="yes"
TYPE="Ethernet"
UUID="a1210692-da12-417d-862e-152ffb8ab93c"
ZONE=internal
DESCRIPTION="LAN"

I setup a new NIC on my server, ETH1 the network config for Rogers on it looks like this:

[root@pbx-07 ~]# cat /etc/sysconfig/network-scripts/ifcfg-eth1
DEVICE=eth1
BOOTPROTO=static
ONBOOT='yes'
IPADDR=10.0.30.138
NETMASK=255.255.255.248
ZONE=external
DESCRIPTION="ROGERS"

You'll notice that there is NO GATEWAY.  You don't want to assign multiple gateways, it will confuse things.  We keep the primary gateway on whatever direction your internet will actually go on, or the main network.

So now you'll have something like this once you save your changes and restart your networking

1: lo: <LOOPBACK,UP,LOWER_UP> mtu 65536 qdisc noqueue state UNKNOWN
    link/loopback 00:00:00:00:00:00 brd 00:00:00:00:00:00
    inet 127.0.0.1/8 scope host lo
    inet6 ::1/128 scope host
       valid_lft forever preferred_lft forever
2: eth0: <BROADCAST,MULTICAST,UP,LOWER_UP> mtu 1500 qdisc pfifo_fast state UP qlen 1000
    link/ether 00:11:51:01:11:2f brd ff:ff:ff:ff:ff:ff
    inet 10.1.100.59/24 brd 10.1.100.255 scope global eth0
    inet6 fe80::215:5dff:fe06:182f/64 scope link
       valid_lft forever preferred_lft forever
3: eth1: <BROADCAST,MULTICAST,UP,LOWER_UP> mtu 1500 qdisc pfifo_fast state UP qlen 1000
    link/ether 00:11:51:16:11:31 brd ff:ff:ff:ff:ff:ff
    inet 10.0.30.138/29 brd 10.0.30.31 scope global eth1
    inet6 fe80::215:5dff:fe06:1830/64 scope link
       valid_lft forever preferred_lft forever

Now we need to get to their PBX gateways.  They use the 173.46.30.0/24 network, and although it might be possible for you to trace/ping to that IP via internet, you'll need to access it via their private network they have installed FROM the private IP address they have assigned to you.

Since we want this particular network to go out ETH1 towards the Rogers network, we'll need to put in a ROUTE to tell your asterisk PBX that any traffic to/from that network comes via ETH1 (not ETH0 which is your likely default gateway)

Type this command into your CLI

route add -net 173.46.30.0 netmask 255.255.255.0 gw 10.0.30.137 dev eth1

You should now be able to traceroute to that IP, and the traffic should pass across the 10.0.30 subnet

[root@pbx-07 ~]# traceroute 173.46.30.202
traceroute to 173.46.30.202 (173.46.30.202), 30 hops max, 60 byte packets

 1  10.0.30.137 (10.0.30.137)  0.514 ms  0.492 ms  0.480 ms


Well this is good, but this route isn't persistent.  You'll need to make sure it re-establishes that route if you need to reboot.  

To make it persistent, create the following file /etc/sysconfig/network-scripts/route-eth1

and then add in the information below.
GATEWAY0=10.0.30.137
NETMASK0=255.255.255.0
ADDRESS0=173.46.30.0

Save your changes.

MAKE SURE YOU HAVE THE SYNTAX EXACTLY RIGHT, ELSE IT WILL FAIL

Now your trunk config in asterisk.

I did mine in FreePBX, so this is what my FreePBX trunk looks like:

I created a SIP trunk and this is the PEER DETAILS for the trunk.
(if anyone reading has suggestions to tweek these details please leave a comment!)

You don't need anything in INCOMING or registration string.

Make sure you have valid SIP networking in place.  I'm using FreePBX so you'll want to make sure asterisk knows that its a valid sip domain


Create an outbound route for Rogers, you'll need to dial all 10 digits for calls.

Now setup an INBOUND routes for your Rogers connection.

Likely the numbers are going to come in as full 10 digit numbers so it would look something like

You should be all done!

From the Asterisk CLI you can issue the command

sip show peers

the response would be something like:

Name/username Host                  Dyn Forcerport Comedia  ACL Port     Status    
T33ROG01         173.46.30.202        Yes  Yes                              5060     OK (40 ms)
T34ROG02         173.46.30.218        Yes  Yes                              5060     OK (31 ms)

Friday, March 13, 2020

Synology sa3400 office 365 alert email smtp

I struggled with this...couldn't figure it out...deleted it then got it working on my second go around.

I put all the settings above, pressed apply, then hit test, worked.

This is my exactly what I did to get it work, albeit I've normalized the email names.  But I just used my Office365 account and it works.


Alternatively you can use a PUSH service that is available


Enter in your email adderss, then hit SEND VERIFICATION email

Should get an email to your inbox.  Use the link sent to activate and you should be good to go.

Wednesday, March 11, 2020

Dialplan Injection Asterisk

Here's some examples of how to use the Dialplan Injection module in the ISSABEL PBX asterisk distribution.

EXAMPLE 1

We'll show how to put in a simple message into the log file.


  1. First, create a "description"
  2. LogMessageExample
  3. Then select SUBMIT
  4. Select the LogMessageExample heading that will appear on the upper right
  5. Now you will see more settings become available that you can use to enter in data.
  6. Extension:  Put in an extension number that you can call that will activate this.  Can be a test number.  500 has been used in this example
  7. In the commands section, put in this:

    NoOp( ########## This is a test #########)
  8. For Destination select
    FEATURE CODE ADMIN --->  *43 ECHO TEST
  9. Configuration should now look like this:
  10. Select SUBMIT and Apply changes
  11. Call the "500" number from an extensions

Below is an excerpt from the live log.

You'll see in the LIVE log your code being executed and displaying the "This is a test" message and the dialplan continuing onto *43 Echo Test


EXAMPLE 2

Here's something more advanced.

We'll use dialplan injection to query the SQL database for a dataset, then use dynamic routes to direct the call based on the value returned.

Disclosure
We can do this example below using DYNAMIC ROUTES only, but were showing how we can collect a variable and pass it between modules in a call.

The DIALPLAN INJECTION  will read the PINSET database and pull a value in it.

Then the DYNAMIC ROUTES will send the call based on the value the DIALPLAN INJECTION module retrieved

If its a "99" we'll send it to ECHOTEST
If its a "55" we'll send it to a SPEAKING CLOCK

  1. CREATE a PINS SET called "TESTPIN" and put a entry of 99
  2. Now Create a Dynamic Route called "SQLTEST"
    (If you aren't familiar with dynamic routes, follow this link for deeper dive)
  3. Select SOURCE TYPE as "Asterisk Variable"
  4. Variable String = ${PINNUMBER}
  5. Set 99 = feature code admin EchoTest
  6. Set 55 = Feature code admin Speaking Clock

    Should look like this when you are done:
  7. Save/Submit your changes
  8. Create a DialPlan Injection called SQLtest
  9. Extension: The number you call to run this script

    COMMANDS
    the following below.  Change dblogin/dbpass for your SQL server)

    Set(dblogin=LOGIN)
    Set(dbpass=PASSWORD)
    MYSQL(Connect connid localhost ${dblogin} ${dbpass} asterisk)
    MYSQL(Query resultid ${connid} select passwords from pinsets where description 'TESTPINS')
    MYSQL(Fetch fetchid ${resultid} PINNUMBER)
    NoOp(##### retrived ${PINNUMBER})
    MYSQL(Disconnect ${connid})
    MYSQL(Clear ${resultid})
  10. Set the destination to be Dynamic Routes - SQLTEST
  11. Should look like this:
  12. Submit and apply your changes.
  13. Run your script by dialing the 500 test number

    You should get a "You are now in an echo test" when you make your call.
  14. Go into PINSET in the GUI and change 99 to 55, submit and apply your changes
  15. Run your script by dialing the 500 test number

    You should get a "The Current Time is..." when you make your call.

    The code will query the PINSET database, pull the value of TESTPINS and store it "PINNUMBER" variable.  It is Passed to Dynamic Routes and the variable controls the call direction.

Here is what the log should look somewhat look like.


Example 3

Quick example, if selections are made in an IVR you can use this to track the picks

In dialplan injection use this code to store the text VALUE in the userfield in the CDR tabel

set(CDR(userfield)=VALUE)

This example shows how each IVR selection can be saved


Tuesday, March 10, 2020

Postfix Office365 SMTP Relay on Ubuntu 18.04

Here's some instruction on how to install Postfix on Ubuntu 18.04 LTS to configure it to use Office 365 as a SMTP relay that should work for you.
Install POST FIX
apt-get install postfix mailutils sasl2-bin
During the installation you'll be asked 2 questions, use the default settings
“General type of mail configurationselect “Internet Site”
“System mail name” to use your FQDN (likely will be already populated)
Create the file sasl_password in /etc/postfix 
nano /etc/postfix/sasl_password
Put in the following, change Office365USERNAME@DOMAIN:PASSWORD to reflect your email credentials and domain

Don't worry, although you see the password in clear text, its only temporary were going to encrypt them shortly and delete this file.
[smtp.office365.com]:587 Office365USERNAME@DOMAIN:PASSWORD
So might look something like 
[smtp.office365.com]:587 John.Smith@company.net:password
Now lets encrypt the password
postmap hash:/etc/postfix/sasl_password
This command creates a hash version of sasl_password called "sasl_password.db".
With Office 365 only send mail with FROM field in email header will be accepted, so now we configure postfix to modify the from field for all the outgoing mail.
Create a file called sender_canonical in /etc/postfix.
nano /etc/postfix/sender_canonical
Here you can add the next line.
Put in the following, change Office365USERNAME@DOMAIN:PASSWORD to reflect your email credentials and domain.
/.+/ Office365USERNAME@DOMAIN:PASSWORD
Create the hash version.
postmap hash:/etc/postfix/sender_canonical
For security purposes let’s make sure the owner of the files created above is the root user and the permissions are 644.
chown root:root /etc/postfix/sasl_password 
chown root:root /etc/postfix/sasl_password.db  
chown root:root /etc/postfix/sender_canonical 
chown root:root /etc/postfix/sender_canonical.db  
chmod 644 /etc/postfix/sasl_password 
chmod 644 /etc/postfix/sasl_password.db  
chmod 644 /etc/postfix/sender_canonical 
chmod 644 /etc/postfix/sender_canonical.db
Set TLS to transmit mail.
cp /etc/ssl/certs/thawte_Primary_Root_CA.pem /etc/postfix/cacert.pem
Edit /etc/postfix/main.cf and add/modify the following lines to our main.cf
nano /etc/postfix/main.cf
Update these lines to the existing config and add the missing ones to the bottom
relayhost = [smtp.office365.com]:587 
smtp_sasl_auth_enable = yes  
smtp_sasl_password_maps = hash:/etc/postfix/sasl_password  
smtp_sasl_security_options = noanonymous
smtp_tls_security_level = may
sender_canonical_maps = regexp:/etc/postfix/sender_canonical  
smtp_tls_CAfile = /etc/postfix/cacert.pem
smtp_use_tls = yes
inet_protocols = ipv4 
Restart Posfix.
service postfix restart
Test it out

Create the a file /etc/postfix/testmail.txt
nano /etc/postfix/testmail.txt
Put this in the file, then save and exit the editor
subject: 365test
Hello this is a test message
Now use this command to send your email.  Just replace the email address below with one that you want to receive your message.

sendmail -v someone@company.com < /etc/postfix/testmail.txt
Shouldn't take very long for the test email to go out, but you can look at the progress of your server with this command:
tail - f /var/log/mail.log
You'll see something like this with a successful email
Jan 10 13:28:35 pulse postfix/cleanup[31290]: warning: /etc/postfix/main.cf, line 51: overriding earlier entry: inet_protocols=all
Jan 23 13:28:35 pulse postfix/pickup[31230]: 803E5600973: uid=1000 from=<UBUNUTUSERNAME>
Jan 23 13:28:35 pulse postfix/trivial-rewrite[31291]: warning: /etc/postfix/main.cf, line 51: overriding earlier entry: inet_protocols=all
Jan 23 13:28:35 pulse postfix/cleanup[31290]: 803E5600973: message-id=<202003101335.803E5600973@FQDN>
Jan 23 13:28:35 pulse postfix/qmgr[31231]: 803E5600973: from=<first.last@company.net>, size=300, nrcpt=1 (queue active)
Jan 23 13:28:35 pulse postfix/smtp[31292]: warning: /etc/postfix/main.cf, line 51: overriding earlier entry: inet_protocols=all
Jan 23 13:28:45 pulse postfix/bounce[31293]: warning: /etc/postfix/main.cf, line 51: overriding earlier entry: inet_protocols=all
Jan 23 13:28:45 pulse postfix/smtp[31292]: 803E5600973: to=<someone@company.com>, relay=smtp.office365.com[40.100.140.114]:587, delay=9.7, )
Jan 23 13:28:45 pulse postfix/cleanup[31290]: 38628600976: message-id=<20200318628600976@FQDN>
Jan 23 13:28:45 pulse postfix/qmgr[31231]: 38628600976: from=<first.last@company.net>, size=2095, nrcpt=1 (queue active)
Jan 23 13:28:45 pulse postfix/bounce[31293]: 803E5600973: sender delivery status notification: 3862860
Jan 23 13:28:45 pulse postfix/qmgr[31231]: 803E5600973: removed
Jan 23 13:28:53 pulse postfix/smtp[31292]: 38628600976: to=<someone@company.com>, relay=smtp.office365.com[40.100.140.114]:587, delay=8.2, )
Jan 23 13:28:53 pulse postfix/qmgr[31231]: 38628600976: removed
Assuming that all has gone well, you can delete the original unencrypted password file
rm /etc/postfix/sasl_password

Monday, March 9, 2020

Uninstall Fortinet Forticlient 6.0

How do I get this program off the computer?  The uninstall button not working??  Here's how.
TESTED in Windows 10
  1. Launch FortiClient, then find and select "unlock settings"


    If successful the "unlock settings" button usually disappears.
  2. In the Windows System Tray, right-click the FortiTray icon, then select "Shutdown FortiClient"

  3. Once FortiClient is shutdown, uninstall FortiClient using the Windows Add/Remove Programs application.
  4. BUT what if the uninstall is not highlighted?!?
  5. (tested in windows 10 )
    Open a CMD prompt as ADMINISTRATOR 
  6. Now we'll use the following command.  Please noted that every system I've ever tried this on, the machine force rebooted itself.

    wmic product where "name like 'Forti%%'" call uninstall /nointeractive

    This command uses the "Windows Management Instrumentation" command line to remove the app.
  7. It may take a few minutes for this command to run, but generally, if successful, the computer will reboot and the app will be fully removed.