Monday, August 21, 2017

Reset FreePBX administrator password

If you forget your administrator login information for FreePBX, there is a simple way to log in and reset it. You will need your current root password to proceed with this tutorial.
  1. Log into your FreePBX server via SSH as the root user, using a tool such as PUTTY on Windows, or Terminal on Mac.
  2. Next, bring up your FreePBX web interface in a web browser. Once the page has loaded, press Ctrl + A on your keyboard to highlight everything on the page.
  3. Locate the unique session ID on the left side of the screen, and copy this string. It will look something like this: 98f798ads7f098uhjk32h432234h
  4. In your PuTTY or terminal window, type the following (be sure to replace the unique string with your own, and press enter):
  5. [root@pbx ~]# amportal a u 98f798ads7f098uhjk32h432234h
    Fetching FreePBX settings with gen_amp_conf.php..
    session unlocked!
    [root@pbx ~]#
  6. In your web browser, refresh the login page and you will be automatically logged in.
  7. Visit Admin -> Administrators and select your user on the right side of the page. At this point you can reset your password.

Friday, August 11, 2017

Play a message to calling party when using a specific trunk in asterisk

Do you have a specific route in asterisk that you want to play an automatic message when its used?
Could be an outbound route for for an expensive LD trunk, or maybe you want to play a reminder to your employees prior to the call being established.

FreePBX/Issabel doesn't let you do this out of the box yet (as of Aug 2017) but a bit of custom code will make this work.

INSTRUCTIONS

1> Determine the outbound route you want to use.  In my example, its called "international" (all international calls go out this connection.

2> In "SYSTEM RECORDINGS", create the recording that you would want to be played to callers who use this trunk.  For example "Warning International call being made" and i will call the recording "internationalwarning"

3> open up the file /etc/asterisk/extensions_additional.conf

Find your outbound route in this dialplan. Below is an EXAMPLE of what mine looked like. Yours will be similar,  " [OUTRT-XX]; NAME " will be different as will some of the phone numbers.

My example, calls that start with 011 as the number that is called that uses this trunk.

------ example ---------------

[outrt-1] ; international
include => outrt-1-custom
exten => _011.,1,Macro(user-callerid,LIMIT,EXTERNAL,)
exten => _011.,n,Set(MOHCLASS=${IF($["${MOHCLASS}"=""]?default:${MOHCLASS})})
exten => _011.,n,Set(_NODEST=)
exten => _011.,n,Gosub(sub-record-check,s,1(out,${EXTEN},))
exten => _011.,n,Macro(dialout-trunk,2,${EXTEN:3},,off)
exten => _011.,n,Macro(outisbusy,)

;--== end of [outrt-1] ==--;

----- END EXAMPLE ---------------

4> SELECT and COPY the appropriate code from your dialplan. Make sure you copy the entire section of code for that context.

5> OPEN /etc/asterisk/extensions_override_freepbx.conf  (or _issabel.conf)
(if FOP2 is used, you may need to put this in /etc/asterisk/extensions_override_fop2.conf instead)

PASTE the code into the bottom of this file.

6> Now you want to make a small edit to this file.

You will need to insert a custom code in to each number you have in this route to play the recorded message.  My dialplan uses _011.  Yours might be different so you will need to adjust it accordingly

[outrt-1] ; international
include => outrt-1-custom
exten => _011.,1,Macro(user-callerid,LIMIT,EXTERNAL,)
exten => _011.,n,Playback(./custom/internationalwarning)
exten => _011.,n,Set(MOHCLASS=${IF($["${MOHCLASS}"=""]?default:${MOHCLASS})})
exten => _011.,n,Set(_NODEST=)
exten => _011.,n,Gosub(sub-record-check,s,1(out,${EXTEN},))
exten => _011.,n,Macro(dialout-trunk,2,${EXTEN:3},,off)
exten => _011.,n,Playback(./custom/internationalwarning)
exten => _011.,n,Macro(outisbusy,)

;--== end of [outrt-1] ==--;

Save your changes

7> reload the config in asterisk CLI ( asterisk -cvvr then core reload)
TEST!

What will happen is, when asterisk goes to dial the code, it will run this custom code, play the message then continue the dialing.

PLEASE NOTE!

If you put it in override, future changes to FreePBX wont' over ride this module.

That if you make changes to the numbers contained in this outbound route, you absolutely have to remember to manually update the custom code. Meaning, if you have configured 3 numbers, then you do the above work and remove or add another number, you MUST repeat the above steps, first removing the custom code and replacing it with the one FreePBX generates. The custom override code will supersede and negate any changes you do in FreePBX for that route. This is very important.

Tuesday, August 1, 2017

Installation process for Kamailio 5.2 and Siremis 4.4 on Centos 7

How to install Kamailio 5.2 and Siremis 4.4 on Centos 7
(last tested Successfully on February 2019)  


AS OF FEB 2020 some of the files on the repo aren't available. The system has moved to GIT to download, so some of this information may not apply anymore. 

Tested on a standard deployment of CENTOS 7 minimal build 1810 (in HyperV environment)

Deployment below is based on a fully updated OS available (as of January 2019)

Copy/Paste the commands in BOLD.  Submit them one at a time, waiting for each action to complete.  

INSTALL CENTOS 7 (MINIMAL INSTALL)


Choose the installation language
Set your TIME ZONE


Select your installation destination.

In most cases you just have to select DONE.


The important part.  Select Network and Hostname.


On the right side, select your network interface to “ON

Assuming you are using DHCP your system should get an IP address now (might take a minute).  Note the IP as you’ll need to use that to SSH to the box after.
If you are hard-coding an IP, click on CONFIGURE in the corner and assign the values that are appropriate to your network.

Set your HOSTNAME in the lower left corner


Select APPLY then click on DONE

Select “BEGIN INSTALLATION


 While its installing set your ROOT password.

You don’t need to set a USER CREATION.


Install can take 5-10 minutes, really depends on the speed of your machine.  Once its ready the 'reboot' button will be available for you to complete the base os install.


SSH to the server

I recommend using SSH to configure this box vs typing long commands into the console manually.  You can use whatever SSH client you like.  PUTTY is very popular on Windows machines.

If you aren't sure of the IP of your machine, from the console, login as "root" and use the password you assigned above.

once you are logged in type in
ip addr


You'll see some cryptic info for most show up, but check out to see if you see an IP schema you recognize.  in this example, on ETH0 (pretty standard interface name) the ip is 10.1.80.177
Commands that you need to use in the console are marked in BOLD


UPDATE BOX
yum -y update
INSTALL MARIADB (aka MySQL)
rpm --import /etc/pki/rpm-gpg/RPM-GPG-KEY*
yum -y install epel-release
yum -y install mariadb-server mariadb
systemctl start mariadb.service
systemctl enable mariadb.service
mysql_secure_installation

        "enter for none"
SET ROOT PASSWORD = Y
Remove anonymous users= Y
Disallow root login remotely = Y
Remove test database and access to it? = Y
Reload privilege tables now = Y
INSTALL APACHE
yum -y install httpd
systemctl start httpd.service
systemctl enable httpd.service
rpm -Uvh http://rpms.remirepo.net/enterprise/remi-release-7.rpm
yum -y install yum-utils
INSTALL PHP
yum -y install php
systemctl restart httpd.service
yum -y install php-gd php-ldap php-odbc php-pear php-xml php-xmlrpc php-mbstring php-soap curl curl-devel php-imap php-mysqlnd php-pdo
systemctl restart httpd.service
Install PHPmyadmin (handy if editing SQL data in vtiger)
yum -y install phpMyAdmin
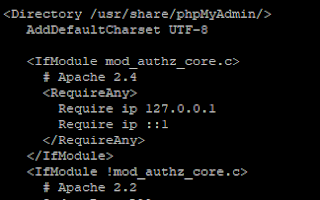
Edit the file
/etc/httpd/conf.d/phpMyAdmin.conf
FIND THIS 
 
MAKE IT LOOK LIKE THIS


Edit the file below and Change "Cookie" to "HTTP"
/etc/phpMyAdmin/config.inc.php  
$cfg['Servers'][$i]['auth_type']     = 'cookie';    // Authentication method (config, http or cookie based)?

systemctl restart  httpd.service
Add entries into firewall
firewall-cmd --permanent --zone=public --add-service=http
firewall-cmd --permanent --zone=public --add-service=https
firewall-cmd --reload
 sed -i -r 's/SELINUX=enforcing/SELINUX=disabled/' /etc/selinux/config
 REBOOT
shutdown -r now
Install KAMAILIO
yum install wget 
cd /etc/yum.repos.d/
wget http://download.opensuse.org/repositories/home:/kamailio:/v5.2.x-rpms/CentOS_7/home:kamailio:v5.2.x-rpms.repo
yum install -y kamailio kamailio-ldap kamailio-mysql kamailio-debuginfo kamailio-xmpp kamailio-unixodbc kamailio-utils kamailio-tls kamailio-outbound kamailio-gzcompress kamailio-presence
Enable MYSQL as the Kamailio DBengine

sed -i -r 's/# DBENGINE=MYSQL/DBENGINE=MYSQL/' /etc/kamailio/kamctlrc
Create users and tables need by Kamailio in MySQL
kamdbctl create
MySQL password for root is the password you set when you ran  mysql secure_installation. 
Answer “Y” yes to the next 3 questions.  Output example below:


Edit the file 
/etc/kamailio/kamailio.cfg
Add the following lines just below #!KAMAILIO

#!define WITH_MYSQL
#!define WITH_TLS
#!define WITH_AUTH
#!define WITH_USRLOCDB
#!define WITH_NAT
#!define WITH_PRESENCE
#!define WITH_ACCDB

Save your changes

Start Kamailio

service kamailio start

Test Kamailio if its running:

kamctl
Should respond with some stuff to show you its running

SIREMIS GUI Install

cd /tmp
wget http://siremis.asipto.com/pub/downloads/siremis/siremis-4.4.0.tgz
tar zxvf siremis*
cp -a siremis*/. /var/www/html
cd /var/www/html
make prepare24


Cleanup of files

rm -rf /var/www/html/Makefile
rm -rf /var/www/html/Changelog
rm -rf /var/www/html/README
chown -R apache. /var/www/html
 Create the file
/etc/httpd/conf.d/siremis.conf
Put in the following in that file

<Directory "/var/www/html/siremis">
        Options Indexes FollowSymLinks MultiViews
        AllowOverride All
        Order allow,deny
        Allow from all
        <FilesMatch "\.xml$">
            Order deny,allow
            Deny from all
        </FilesMatch>
        <FilesMatch "\.inc$">
            Order deny,allow
            Deny from all
        </FilesMatch>
  </Directory>
<Directory "/var/www/html/openbiz">
    AllowOverride All
    Order deny,allow
    Deny from all
  </Directory>
<Directory "/var/www/html/misc">
    AllowOverride All
    Order deny,allow
    Deny from all
  </Directory>


Restart web browser service
systemctl restart httpd
I’ve had weird problems in the past copy/pasting this next command, 
sometimes I have to type it:
mysql –p
(enter sql root password that you set up earlier in this installation)


ENTER IN the following and press enter:
GRANT ALL PRIVILEGES ON siremis.* TO siremis@localhost IDENTIFIED BY 'siremisrw';
Type in EXIT to quit


Edit the file (vi or nano)
/etc/php.ini
Around line 878 you’ll find the following: (in 'vi" press ESC 878 SHIFT+G)

[Date]

; Defines the default timezone used by the date functions
; http://php.net/date.timezone
;date.timezone =

Remove the semicolon in front of date.timezone =
and then enter in your time zone


Save your changes and exit

Restart the services
systemctl restart httpd
service firewalld stop        
sudo systemctl start httpd.service
sudo systemctl enable httpd.service
Visit the following URL
http://IPorFQDN/siremis
IE http://192.168.201.10/siremis


If all went well you should see this show up in your browser!

Click on SETUP NOW


Click on NEXT


SELECT all 4 boxes in RED then click on NEXT


Should be all ready.  Select NEXT


Note the default user/password
Click on LAUNCH SIREMIS (it will automatically take you to the screen after 30 secs)


MAIN SCREEN


ISSUES:

During testing, navigating to SIP USER MENU- SUBSCRIBER DATA resulted in error with 2 missing columns in the "subscriber" table.

Research showed these two tables were part of the design and the column types were provided.  Below creates the two columns should this error be encountered.

mysql -puse kamailio;
ALTER TABLE `subscriber` ADD `rpid` VARCHAR(64) NULL DEFAULT NULL ;ALTER TABLE `subscriber` ADD `email_address` VARCHAR(64) NOT NULL ;exit;