Yes! You have some screen pop ability in a web browser pushing simple information data that is a mix of data caller ID, and a data pulled from a simple CSV file that you upload manually. And far more complex too, read on!
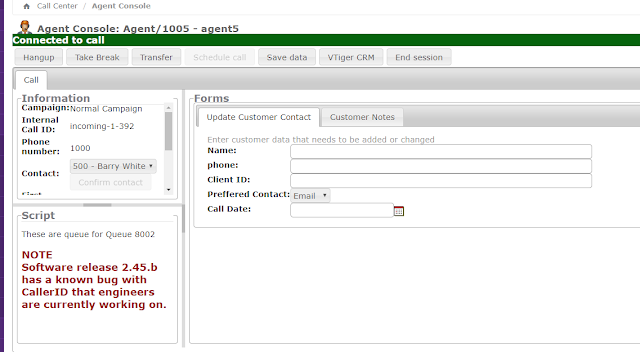
SCRIPT - This can be used in several ways. The intended option is to prompt your agent with info about the queue the call has arrived on, and the information they should give to the customer.
You can use it for campaign/queue information (agents can belong to multiple queues so this is a way to allow them to know what queue is calling) This information can be altered by call center admins, with the data automatically refreshing on all agent screens automatically.
Forms - You can create forms and agents can fill the information in these boxes while on a call, and save it. Supervisors can run a report to see this data in a CSV file in a spreadsheet program.
CRM - Yes, you can integrate with the CRM. Vtiger is mentioned alot, and the integration although not completely seamless to get going, is relatively simple in the grand scheme. At its basic level, the agent can click on the CRM button and be taken to the Vtiger instance, and really be taken to any page you want to provide.
The call center system has the ability to provide dynamic URLs with variables in the URL that can direct users to a customized urls. In this blog we discuss how to do ticket integration.
This is the browser window that the agents can use to help interact with the caller.
The top shows the agent phone info (extension 1005- followed by agent name)
The call status bar (our example shows green connected) gives a visual indication if the agent is on a call (its red if they are not). Shows how long they are talking to customer.
Call control boxes- agents can control the phone call through these buttons. Take Break allows them to go NOT ready and with a a break type that you can specify.
INSTALLATION
Its pretty easy. The ISO you download is a complete OS and PBX that will completely install itself on most any computer you have. Everything is opensource so there isn't anything to buy or licence. to make it work!
It uses the LINUX operating system, but dont worry, if you aren't familar with LInux, there is very very little that you'll probably have to do with it ever really. The entire installation is automatic. Just follow the steps bellow and as long as you dont have some hardware incompatibilities, you will be up and running in a short time.
Discussion below is based on ISSABEL4 20181002.iso with 4 gig of ram and a 50gig HD size.
(ISO available as of January 2019).
You can burn this to a DVD (if you are still stuck in the 2000's) or you can put it on a USB key (https://rufus.ie/) can help you get a bootable USB key. Maybe your are far more advanced than that and you just install it on a vm.
===============================
There are 4 things you have to know to make an inbound call center installation work:
Install Asterisk 11 only. 13 doesn't work (yet)
MUST have phone registered to even test first time login
Agent MUST be configured properly in PBX queue dynamic or static agent positions.
Do NOT use 3 digit extensions..
==================================
THIS IS VERY IMPORTANT
For contact center to work, (as of January 2019)
you must select the installation of
*** Asterisk 11 ONLY***
Select Asterisk 11 and Call Center CE in the installation (assuming you want the CC part installed at this time).
Takes 20-30 minutes to install.
After you install, logon with ROOT
and then use the password you assigned during install
at the command prompt then type in IP ADDR and get the IP of your machine.
INBOUND "AGENT" CALL CENTER
The agent 'always being ready for a call'. This type of call center is known as "Agent" in Issabel. This is usually used by call centers in an outbound dialer environment. As soon as the customer answers their phone, the agent is instantly connected, not ringing is heard. This means the agent has a headset on and is ready to talk. Issabel plays music in the agents ear, and when the caller is connected, the music stops to indicate the customer is on the line. Option 2, any agent can logon to any phone.
Login to the GUI using http://IPofIssabel
You'll need to create an account with Issabel websystem to get further updates
If this is a new configuration, please check your NAT settings in Asterisk. If you are testing phones and your soft/hard phone is on a different network segment than your Issabel installation, it will probably fail

The critical one is putting in your external IP address. That will really cause things to fail
You'll also want to put in local networks that you will have phones in that might be different than the one your PBX is in. For most cases, if you are a small location you might only have one, but larger offices will split up teams to different network segments so you'll need to include the different ones here.
Creation of an "AGENT" mode (agent auto answer) center
Create an EXTENSION of 1002 in PBX

Save your changes
Setup a soft/hard phone with that number. Make sure its working. Dialing *43 will put you into an echo test and you can hear your voice. Make sure your call works for at least 30 - 1 minute without disconnecting.
 You will need an active, functioning registered SIP phone for successful Agent login.
If phone is not available, the call center will not allow you to login.
Select
Call Center -> Agent Options -> Agents
Select
"NEW AGENT" button
 Give it an Agent number, name of Jane Doe and a numeric password
The Agent Number doesn't need to correspond to a phone number here. This could be a unique employee number or some identifier of this agent. Useful if you have employees with same or similar names.
Now HERE is the part everyone seems to miss!!!!
The "AGENT NUMBER" you put in MUST BE put in
"STATIC AGENTS" box in the queue.
!!!!!!!!!!!!!!!!!!!!!!!!!!!!!!!!!!!!!!!!!!!!!!!!!!!!!!!!!!!!!!!!!!!!!!!!!!!!!!

Enter it as A99899,0
It HAS to be prefixed' with an "A" for agent.
Save your changes
Now you want to activate the queue for ISSABEL call center to know to use it.
Now click on INCOMING CALLS
Click on QUEUES
Click on "+Select Queue"
In the "Select Queue:" drop box select the queue you have created.
You can optionally put in a script. This text will appear in the agent desktop screen pop
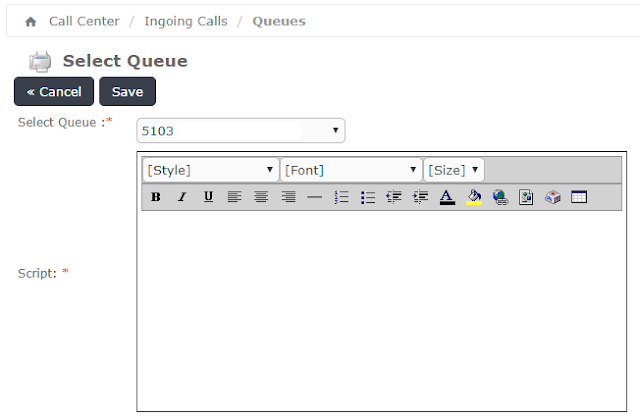 Click on SAVE
Now click on AGENT CONSOLE from the left menu
Select
AGENT NUMBER.
(In our example, select Agent/9888998 Jane Doe)
Then select
extension
you want the call to ring to. Our example will be extension 1002
Press enter.

The agent phone will ring.
Answer the call and you will be prompted
"Please enter your agent ID"
Enter in the password you gave to the agent and press the # pound/hash key
and you will be logged into the queue "Agent Logged In"
You will hear music in your ear.
TEST
Call the queue. Your agent, will hear music until the queue delivers him a call. When he gets the call, the music will stop and the agent will hear a "Beep".
Once they hear the beep, the agent and the caller are joined and they can speak.
Data with inbound call
CONFIGURING "INFORMATION" box
The information box displays CallerID info, plus some information about the call. You can very easily include customer name information based on the phone number.
Click CALLCENTER - INCOMING CALLS - CLIENTS - DOWNLOAD CONTACTS
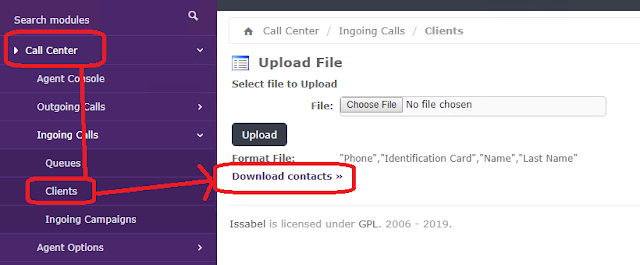
If this is your first time, this is a handy way to get the file formation (CSV) and the columns ISSABEL Call Center will want.
The system will expect a CSV file with 4 columns
"Phone","Identification Card","Name","Last Name"
When you create or use the file downloaded it will look like this. Note, there is no header information in the file. ISSABEL will match on the CALLERID. Note. In the file don't put in special characters, just data.
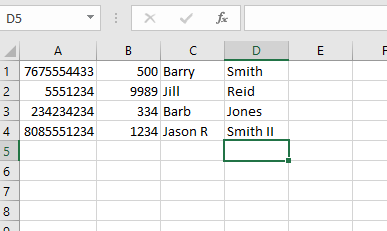
When a caller arrives at an agent desk, this will do a lookup into the contacts of this CSV file when you have uploaded it and provide data matches where available.
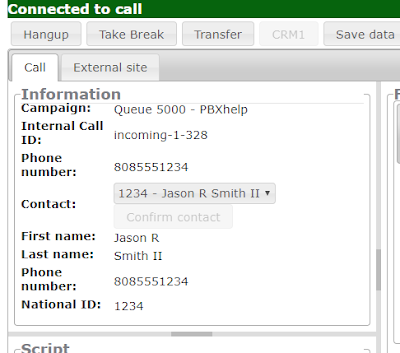 You can see where we've called in to the queue, the phone number CID number triggered a lookup in the CSV file and displayed the data to the agent.


