There doesn't really seem to be a lot of information on how this thing works with its command structure. Not that this document is any better, but I'll put what I know to make this work.
For relevance, the examples below are using two computers with an instance of OBS on each one.
OBS 1 is the "switcher" sending video, and Websocket commands, to OBS 2 "graphics machine" to start recording.
We will be using Advanced Scene Switcher plugin.
Steps:
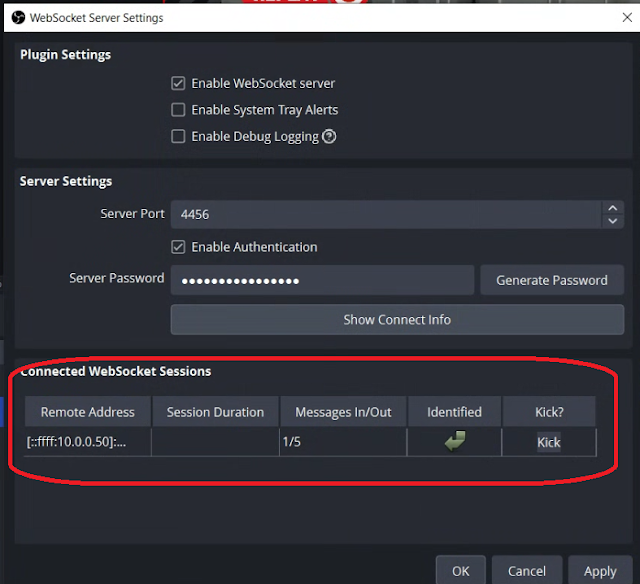
Activate Websockets in your Second OBS.

Set a password and check the enable box.

You create a name for this connection, and enter in the IP, port and password of the machine.

Here's an example of a json message in the websocket OBS window

{
"d":
{
"requestData": {},
"requestId": "",
"requestType": "ToggleRecord"
},
"op": 6
}
{
"d":
{
"requestData": {},
"requestId": "",
"requestType": "XXXXX"
},
"op": 6
}
You can substitute the XXXXX with some of the following examples:
StartRecord
StopRecrod
ToggleRecord
StartReplayBuffer
StopReplayBuffer
SaveReplayBuffer
StartVirtualCam
StopVirtualCam
ToggleVirtualCam
Heres some other commands. Use this syntax
This will let you change the scene of a remote OBS.
The command is "SetCurrentProgramScene"
But substitute "XXXXX" for your Scene Name
{
"op": 6,
"d":
{
"requestType": "SetCurrentProgramScene",
"requestId": "2",
"requestData":
{
"sceneName": "XXXXXX"
}
}
}
Here's some other commands:
YYYYYY / XXXXX
CreateScene / SceneNameYouWant
RemoveScene / SceneName
{
"op": 6,
"d":
{
"requestType": "YYYYYYY",
"requestId": "2",
"requestData":
{
"sceneName": "XXXXXX"
}
}
}
Here's some other commands:
YYYYYY / XXXXX / ZZZZZZ
{
"op": 6,
"d":
{
"requestType": "YYYYYY",
"requestId": "2",
"requestData":
{
"sceneName": "XXXXXX",
"newSceneName":"ZZZZZZ"
}
}
}
TriggerHotkeyByName
Here's what they dont tell you about this command, you need to preface the transition name with " OBSBasic."
So to use transition, you need to have "OBSBasic.Transistion"
{
"d": {
"requestData": {
"hotkeyName": "OBSBasic.Transition"
},
"requestId": "24",
"requestType": "TriggerHotkeyByName"
},
"op": 6
}
Here are some of the Hotkey Names
PTZ.PanTiltUpLeft PTZ.Save15
PTZ.PanTiltLeft PTZ.Recall16
PTZ.PanTiltDownLeft PTZ.Save16
PTZ.PanTiltUpRight ReplayBuffer.Save
PTZ.PanTiltRight OBSBasic.StartStreaming
PTZ.PanTiltDownRight OBSBasic.StopStreaming
PTZ.PanTiltUp OBSBasic.ForceStopStreaming
PTZ.PanTiltDown OBSBasic.StartRecording
PTZ.ZoomWide OBSBasic.StopRecording
PTZ.ZoomTele OBSBasic.PauseRecording
PTZ.FocusAutoFocus OBSBasic.UnpauseRecording
PTZ.FocusNear OBSBasic.SplitFile
PTZ.FocusFar OBSBasic.AddChapterMarker
PTZ.FocusOneTouch OBSBasic.StartReplayBuffer
PTZ.SelectPrev OBSBasic.StopReplayBuffer
PTZ.SelectNext OBSBasic.StartVirtualCam
PTZ.ActionDisableLiveMovesToggle OBSBasic.StopVirtualCam
PTZ.ActionFollowPreviewToggle OBSBasic.EnablePreview
PTZ.ActionFollowProgramToggle OBSBasic.DisablePreview
PTZ.Recall1 OBSBasic.EnablePreviewProgram
PTZ.Save1 OBSBasic.DisablePreviewProgram
PTZ.Recall2 OBSBasic.ShowContextBar
PTZ.Save2 OBSBasic.HideContextBar
PTZ.Recall3 OBSBasic.Transition
PTZ.Save3 OBSBasic.ResetStats
PTZ.Recall4 OBSBasic.Screenshot
PTZ.Save4 OBSBasic.SelectedSourceScreenshot
PTZ.Recall5 OBSBasic.SelectScene
PTZ.Save5 OBSBasic.SelectScene
PTZ.Recall6 OBSBasic.QuickTransition.15
PTZ.Save6 OBSBasic.QuickTransition.16
PTZ.Recall7 OBSBasic.QuickTransition.17
PTZ.Save7 Hide on DSK 1
PTZ.Recall8 Enable Tie DSK 1
PTZ.Save8 Disable Tie DSK 1
PTZ.Recall9 startSwitcherHotkey
PTZ.Save9 stopSwitcherHotkey
PTZ.Recall10 startStopToggleSwitcherHotkey
PTZ.Save10 upMacroSegmentSwitcherHotkey
PTZ.Recall11 downMacroSegmentSwitcherHotkey
PTZ.Save11 removeMacroSegmentSwitcherHotkey
PTZ.Recall12 OBSBasic.SelectScene
PTZ.Save12
PTZ.Recall13
PTZ.Save13
PTZ.Recall14
PTZ.Save14
PTZ.Recall15
SetPersistenData
Into the global one, set the name as TestSlot and put in a value of 5
{
"d": {
"requestData": {
"realm": "OBS_WEBSOCKET_DATA_REALM_GLOBAL",
"slotName": "TestSlot",
"slotValue": "5"
},
"requestId": "31",
"requestType": "SetPersistentData"
},
"op": 6
}
You can verify that a connection is happening if you look at the Websockets config page on your receiving machine. You should see some references to the IP of your source computer
Here's a link to the github site with all the commands that you could potentially use.
obs-websocket/docs/generated/protocol.md at master · obsproject/obs-websocket · GitHub
WebSocket client disconnect code
UnknownReason = 4000,
The server was unable to decode the incoming websocket message
MessageDecodeError = 4001,
// The specified `messageType` was invalid
UnknownMessageType = 4002,
// The client sent a websocket message without first sending `Identify` message
NotIdentified = 4003,
// The client sent an `Identify` message while already identified
AlreadyIdentified = 4004,
// The authentication attempt (via `Identify`) failed
AuthenticationFailed = 4005,
// There was an invalid parameter the client's `Identify` message
InvalidIdentifyParameter = 4006,
// A `Request` or `RequestBatch` was missing its `requestId`
RequestMissingRequestId = 4007,
// The websocket session has been invalidated by the obs-websocket server.
SessionInvalidated = 4008,
// The server detected the usage of an old version of the obs-websocket protocol.
UnsupportedProtocolVersion = 4009,
