Sunday, January 22, 2023

Multiple rtsp on Sony SRG-X120

Here's how you get multiple RTSP streams working on a SRG-X120 camera

By Default, 1 RTSP stream is configured.  All you have to do to make it work is go to your device that you want to get the video and create a rtsp connection like this:

rtsp://IP_of_CAM/video1  rtsp://IP_of_CAM/video2 and rtsp://IP_of_CAM/video3

You have to activate video2 and video3.

Go to SETTINGS -> VIDEO -> VIDEO CODEC


You'll see "Image 1" is configured, but by default, "Image 2" and "Image 3" are not.

In the drop box, select "H.264" and then you can adjust the other settings if you want. 
Default might be enough.

Click on "OK"

Here's an example in OBS connecting to the second RTSP stream using a "MEDIA Source

put in the URL (same url for VMIX)

rtsp://IP_of_CAM/video2  /video2 or /video3

Remove "INPUT FORMAT" entry.


Click on "OK" 

Couple of seconds later you should see video!

SRT setup on a Sony SRG-X120 SRG-X400

 Here's a bit of info on how to setup a SRT config on an SRG-X120 camera.

First, you'll need version 3.0 of the firmware

You can go to Sony's page to get the firmware and instructions how to update

1> First, to get SRT activated, go to  Settings-> Audio-> SEND = Enabled -> OK


2> Then you go into your camera, go to SETTINGS - STREAMING


3> In Streaming mode, pick if you are a Caller or a Listener


Caller = You are going to have the camera connect to an IP and send the video
Listener = External device is going to connect to the camera IP to receive the video. 

SRT-LISTENER MODE AND SRT-CALLER MODE

#############    SRT-LISTENER MODE   ######################
I find "LISTENER" mode more robust.  If there's a network hiccup, OBS will attempt to automatically reconnect to the camera stream.

1> On the SRG-X120 interface go to SETTINGS - STREAMING

2> select Streaming Mode "SRT-LISTENER

In our example, we are leaving everything default, we are just giving it port 4201 for our example


3> Click on "OK" at the bottom

This example uses OBS as the video switcher that is going to reach out to the camera and get the feed.  So the OBS instance will be using "CALLER MODE" to match the camera's "LISTENER" mode.

4> In OBS we are going to create a scene called SRT Caller
then we are going to select a "MEDIA SOURCE"


5> Inside MEDIA SOURCE we'll UNCHECK "Local File"

7> in the "INPUT" box we'll put in the following syntax

srt://SRT_Source_IP:PORT?mode=caller&latency=5000

The SRG X120 camera's IP is 192.168.0.14, so that is the IP we put in the OBS system.  We'll define the port, we are using 4201 in this example.  So the Syntax will look like:

srt://192.168.0.14:4201?mode=caller&latency=5000


8> Click on "OK"

You should now see the source video automatically appear


One thing to note:  I've noticed that sometimes the video won't appear right away, this might be from just doing some different configs, but something to try is bouncing the SRG-X120 streaming mode "OFF" then "ON" again.


Make sure that you select "OK" at the bottom of the selection window to activate the different selection modes.


###########              SRT-CALLER MODE            ###########
Caller mode does not support an automatic retry if the destination (OBS) becomes unavailable.

In this example, we'll have the camera SEND the video to a device, in our example, OBS

1> We'll select SRT-Caller
2> in "DESTINATION" entry box we'll put in the following syntax

    srt://Destination_IP:PORT

In the case of the example, the OBS computer receiving the video is 192.168.0.5 and it will listen on port 4501

srt://192.168.0.5:4501


For simplicity in our example, we'll leave all the other values as default and 

3> press OK at the bottom

4> In OBS, we'll create a new scene called called "SRT LISTENER

and inside sources we'll create a Media Source 


5> Inside MEDIA SOURCE UNCHECK "Local File"

6> Uncheck "Restart playback when source becomes active"

7> in "INPUT" we'll put in the following syntax

srt://LocalOBS_IP:PORT?mode=listener&latency=5000

In this example, OBS is running on a computer with the ip of 192.168.0.5, so that is the IP we put in the OBS system.  We'll define the port, we are using 4501 in this example. 
The Syntax will look like:

srt://192.168.0.5:4501?mode=listener&latency=5000


8> Select OK

10> Now go back to your SRG-X120 camera GUI

9> Click on LIVE at the top

then down a bit in STREAMING 

10> click on "STREAM NOW".  You should see the destination IP and port.


10> You will be asked to confirm that you want to stream


In the SRG-X120 screen you will see (assuming everything was configured correctly) the screen give a red outline to indicate its streaming:


And if you go to OBS (or whatever system you are receiving the video) it should show up

Saturday, January 21, 2023

Sony SRG-X120 Firmware upgrade

Settings - Initialize -

Select the firmware you want to apply om tje 
Version Up section


You'll get prompted the transfer is happening.


Within 2 minutes (usually less) you will see this message:

If your camera is stuck in the "transferring" dialog window shown above, after 5 minutes, in my experience its safe to power cycle the camera and try again.


After about 10 minutes the light goes from blinking red to blinking green, then steady green, then 2 steady green lights.  After about 2 minutes the camera should be accessible again.

Factory HTML Password

Username: admin 

Password: Admin_1234

Tuesday, January 10, 2023

Hantec 1008C scope

Software can be found here SETUP

Hantek 1008C PC Scope

Setting Up an AudioCodes MP118 FXS with Asterisk using Web Interface

This doc was copy/pasted from another site, I dont remember.  I saved it incase the source disappeared.  

This is a quick and dirty configuration process for Asterisk setup and AudioCodes MP-118 Gateway SIP/Analog FXS.
> Reset
1) Disconnect network cable (mandatory !)
2) Press the reset button for more than 6 sec.
3) Wait until the Fail light is off and then reconnect network cable.
> Configure
4) Connect to web interface
Default ip
IP Address: 10.1.10.10
Subnet: 255.255.0.0
Gateway 0.0.0.0
Account: Admin
Password: Admin
5) Change ip address/GateWay/DNS: in the panel, click the Configuration button on the upper left, and then VoIP -> Network -> IP Settings
6) Save the config: In the upper click on Device Action -> Reset -> Click on button Reset
7) Reconnect to the web interface, and VoIP -> Coders and Profiles -> Coders: here you can define codecs to use in order of priority.
(Att: Silence suppression: Disabled, Packetization Time: 20)
8) We can now configure the AudioCodes MP-118 to detect your Asterisk Server. VoIP -> SIP Definitions-> Proxy & Registration. Here set Use Default Proxy to Yes and Enable Registration to Enable.
9) Here there is a button for Proxy Set Table, click, and to open a new window where you can set the asterisk ip address, and Transport Type UDP, and Enable Proxy Keep Alive using Options.
10) VoIP -> SIP Definitions-> Proxy & Registration.
Registrar Name:
Registrar Ip Address:
Registrar Transport Type: UDP
Registrar Name:
Gateway Name:
Gateway Ip Address:
Subscription Mode: Per EndPoint
Cnonce: asterisk
Registration Mode: Per Endpoint
11) VoIP->GW and IP to IP->Analog Gateway->Authentication. Here you can configure your Extensions (1->8) and password.
12) VoIP->GW and IP to IP->Hunt Group->EndPoint Phone Number
Channels: 1 – Phone Nr: <ext number for FXS1> – Hunt Group ID: – Tel Profile ID: 0
Channels: 2 – Phone Nr: <ext number for FXS2> – Hunt Group ID: – Tel Profile ID: 0
…….
13) Incoming call – GW & and IP to Ip -> Hunt Group -> Hunt Group Settings -> Channel Select Mode: By Dest Phone Number
14) Save Config (see 6)
Att: To configure you must use only Explorer & Firefox. I’ve found that Safari does not work correctly !
..last but not least…. to use fax with T.38….
Voip->Media->Fax/Modem/CID Settings
– Fax Transport Mode: T.38 Relay
– Fax CNG Mode: Sends on CNG or v8-cn
– CNG Detector Mode: Relay
– Fax Relay ECM Enable: Enable
– Fax Relay Max Rate: 14400bps
SIP Definitions->General Parameters
– Enable Early Media: Enable
– Session Expires Method: re-INVITE
– Fax Signaling Method: T.38 Relay
…and if you prefer without T.38…..
Voip->Media->Fax/Modem/CID Settings
– Fax Transport Mode: ByPass
– Fax/Modem Bypass Coder Type: g771 alaw
– CNG Detector Mode: Disable
SIP Definitions->General Parameters
– Fax Signaling Method: No Fax
Linkografia

ISSABEL PBX GUI Customization

Just some reference stuff I used to customize the Issabel PBX GUI software circa 2018

 Here's the changes to customize Issabel after install
what is geoip
=============================================================================
Update Main Login Page webpage title name (the one at the top) (confirmed)
sed -i -r 's/<title>Issabel -/<title>COMPANYNAME -/' /var/www/html/themes/tenant/_common/login.tpl
=============================================================================
Service name (dashboard service names) (confirmed)  $arrSERVICES["Dialer"]["name_service"]     = "Issabel Call Center Service";
sed -i -r 's/Issabel Call Center Service/Contact Center Service/' /var/www/html/modules/dashboard/applets/ProcessesStatus/index.php
=============================================================================
Main browser's text name (confirmed)         <title>Issabel</title>
sed -i -r 's/<title>Issabel</<title>COMPANYNAME</' /var/www/html/themes/tenant/_common/index.tpl
=============================================================================
Change Agent Console title (confirmed)         'WELCOME_AGENT'         =>  _tr('Welcome to Agent Console'),
sed -i -r 's/Welcome to Agent Console/COMPANYNAME Agent Console/' /var/www/html/modules/agent_console/index.php
================================================================================
Change title in agent desktop from "END SESSION" to "End Calls and Logout" (confirmed)         'BTN_FINALIZAR_LOGIN'           =>  _tr('End session'),
sed -i -r 's/End session/End Calls and Logout/' /var/www/html/modules/agent_console/index.php
===================================================================================
Change "Take Break" to "Go NotReady"  (confirmed)             
exists in multiple spots
change button name only    'BTN_BREAK'                     =>  _tr('Take Break'),
'break_commit'              =>  _tr('Take Break'),
sed -i -r 's/Take Break/Make Not Ready/' /var/www/html/modules/agent_console/index.php
====================================================================================
Change Vtiger CRM (confirmed)          'BTN_VTIGERCRM'                 =>  file_exists('/var/www/html/vtigercrm') ? _tr('VTiger CRM') : NULL,
sed -i -r 's/VTiger CRM/Ticket CRM/' /var/www/html/modules/agent_console/index.php
==================================================================================================
Portal "username title and password"  (confirmed)  placeholder="Username"   &   placeholder="Password"
sed -i -r 's/Password/GUI Password/' /var/www/html/themes/tenant/_common/login.tpl
sed -i -r 's/Username/GUI Username/' /var/www/html/themes/tenant/_common/login.tpl
=====================================================================================
modules/sec_advanced_settings/index.php  (CONFIRMED)
sed -i -r 's/ IssabelPBX/ PBX/' /var/www/html/modules/sec_advanced_settings/index.php
===========================================================================================================
change the name of the popupbox title info  (confirmed)      $smarty->assign('ABOUT_ISSABEL_CONTENT', _tr('About Issabel Content'));
sed -i -r 's/Change Issabel /Change Contact Center /' /var/www/html/modules/_issabelutils/index.php
sed -i -r 's/About Issabel Content/About Contact Center/' /var/www/html/modules/_issabelutils/index.php
=========================================================================
Change password title (confirmed)          "CHANGE_PASSWORD"           =>  _tr("Change Issabel Password"),
sed -i -r 's/Change Issabel Password/Change Contact Center Password/' /var/www/html/themes/tenant/themesetup.php
================================================================================================
Exists in mutliple locations (confirmed)
set "End Break" to "Make Ready"
            'BTN_BREAK'                     =>  _tr('End Break'),
sed -i -r 's/End Break/Make Ready/' /var/www/html/modules/agent_console/index.php
========================================================================
Exists in 3 places.  (CONFIRMED)
sed -i -r 's/Dismiss/Cancel/' /var/www/html/modules/agent_console/index.php
=====================================================================================
Change title (confirmed)
sed -i -r 's/Issabel - /Contact Center - /' /var/www/html/admin/views/issabel_advice.php
============================================================
Change "No active call" to "Ready for call"
exists in mutliple locations (confirmed)      'TEXTO_ESTADO_AGENTE_INICIAL'   =>  _tr('No active call'),
sed -i -r 's/No active call/Ready for call/' /var/www/html/modules/agent_console/index.php
===========================================================================
Change "On break" to "Not ready"
Exists in multiple locations (confirmed)               'TEXTO_ESTADO_AGENTE_INICIAL'   =>  _tr('On break').': '.$estado['pauseinfo']['pausename'],
sed -i -r 's/On break/Not ready/' /var/www/html/modules/agent_console/index.php
=========================================================================
Change title for make busy codes (Confirmed)
'TITLE_BREAK_DIALOG'            =>  _tr('Select break type'),
sed -i -r 's/Select break type/Not Ready Reason/' /var/www/html/modules/agent_console/index.php
============================
confirmed 
This adds a space above the entry "CAMPAIGN" in the INFORMAITON window

sed -i -r 's/<tbody>/<tbody><br>/' /var/www/html/modules/agent_console/themes/default/agent_console_atributos.tpl
##################################################
===========================================

CONFIRMED  (data pulled form the CSV file uploaded is displayed with these variables
This will insert a line under the "SCRIPT" box to give it a little white space and make it look cleaner.

sed -i -r 's/llamada-script">/llamada-script"><br>/' /var/www/html/modules/agent_console/themes/default/agent_console.tpl
confirmed
This ads a whitespace line under "FORMS" in agent console to make it look cleaner

sed -i -r 's/llamada-form">/llamada-form"><br>/' /var/www/html/modules/agent_console/themes/default/agent_console.tpl
#############################################################
this changes forms entry from "national ID" to something you prefer.  Like "Customer Number"
sed -i -r 's/National ID/Customer No/' /var/www/html/modules/agent_console/index.php
################################################################
CONFIRMED
This updates an "ARE YOU SURE?" message from spanish to english.  Its when you upload the customer CSV file

sed -i -r 's/¿Está seguro de subir la información escogida?/Are you sure you want to upload the information now/' /var/www/html/modules/client/libs/js/base.js
###################################################
Confirmed
Alter the description of the customer CSV file you can upload
sed -i -r 's/Phone","Identification Card","Name/CallerID#","UniqueID#","First Name/' /var/www/html/modules/client/index.php
########################################
This alters the login menu slightly to show COMPANYNAME instead of CALLBACK
sed -i -r 's/Callback Login/COMPANYNAME Queue/' /var/www/html/modules/agent_console/index.php
sed -i -r 's/Callback Extension/COMPANYNAME Extension/' /var/www/html/modules/agent_console/index.php
###############################################
=================================================================================================
Change the colors of the agent Desktop to be a little more meaningful   (CONFIRMED)

Change the Agent desktop color status bar

READY FOR CALL (GREEN)
.issabel-callcenter-class-estado-ocioso {
    background-color: #094895   -------> Change to #248f24
sed -i -r 's/background-color: #094895/background-color: #248f24/' /var/www/html/modules/agent_console/themes/default/css/issabel-callcenter.css

ON CALL - BLUE
.issabel-callcenter-class-estado-activo {
    background-color: #06640D;   ----------> change to 0066ff
sed -i -r 's/background-color: #06640D/background-color: #0066ff/' /var/www/html/modules/agent_console/themes/default/css/issabel-callcenter.css

NOT READY ORANGE
.issabel-callcenter-class-estado-break {
    background-color: #BD0000;   --------->changeto e68a00
sed -i -r 's/background-color: #BD0000/background-color: #e68a00/' /var/www/html/modules/agent_console/themes/default/css/issabel-callcenter.css
==================================================================================================
Top Menu - change to purple  (CONFIRMED)
/var/www/html/themes/tenant/_common/_menu.tpl

current dark gray
<div style="height:83px;background-color:#373e4a;padding:15px;">

Change value to "PURPLE" #522b76
sed -i -r 's/373e4a/522b76/' /var/www/html/themes/tenant/_common/_menu.tpl
========================================================================================================================
This is the campaign montioring tool.  this is the live view names.  (Confirmed)
Can't easily SED these because there are other reference names. 

Edit this file:
/var/www/html/modules/campaign_monitoring/lang/en.lang

Find this list:
'Placing'   =>  'Placing',
'Dialing'   =>  'Dialing',
'Ringing'   =>  'Ringing',
'OnQueue'   =>  'On queue',
'online'    =>  'Free',
'offline'   =>  'Logged out',
'oncall'    =>  'Busy',
'paused'    =>  'On break',
'oncall'    =>  'Busy',

'OnQueue'   =>  'On queue', =--> changej the "On queue" to "Waiting"
'oncall'    =>  'Busy',     =--> change "Busy" to "On Call"
========================================================================
Agent reporting (Confirmed)
Change the title
/var/www/html/modules/rep_agent_information/lang/en.lang

sed -i -r 's/No. Agent/Agent Ext/' /var/www/html/modules/rep_agent_information/lang/en.lang
============================================================================
Incoming call monitoring (confirmed)
/var/www/html/modules/rep_incoming_calls_monitoring/lang/en.lang

sed -i -r 's/=> "Answered"/=> "On Calls"/' /var/www/html/modules/rep_incoming_calls_monitoring/lang/en.lang
sed -i -r 's/=> "Entered"/=> "Total Each Queue"/' /var/www/html/modules/rep_incoming_calls_monitoring/lang/en.lang
sed -i -r 's/=> "Total"/=> "Total All"/' /var/www/html/modules/rep_incoming_calls_monitoring/lang/en.lang
=============================================

This changes the callers "phone nubmer" heading to "CALLER ID" (avoids confusion)
sed -i -r 's/'LBL_CONTACTO_TELEFONO'         =>  _tr('Phone number'),//' /var/www/html/modules/agent_console/index.php

CHANGE THES  ()
           $traduccion = array(
                'first_name'    =>  _tr('First name'),
                'last_name'     =>  _tr('Last name'),
                'phone'         =>  _tr('Contact No'),
                'cedula_ruc'    =>  _tr('Customer No'),

Change this tr heading to Caller ID
'LBL_CONTACTO_TELEFONO'         =>  _tr('Caller ID'),
######################################################
Update Error messaging
In modules/agent_console/index.php
and modules/agent_console/libs/paloSantoConsola.class.php

you can alter the messaging for the agent login to provide onscreen help.  Common problem is forgetting to put agent in Dynamic queue member
Will help future agent configs to remind what the likely problem is that they cant login to the gui

updated message
                modules/agent_console/libs/paloSantoConsola.class.php
$this->errMsg = '(internal) getagentstatus: '.$this->_formatoErrorECCP($connStatus). ' Verify agent is a dynamic queue member (IE S1002,0)?';

and
modules/agent_console/index.php
$respuesta['message'] = _tr('Agent login process not started. Verify agent is a dynamic queue member (IE S1001,0)');
############################################################


/var/www/html/modules/client/themes/default/form.tpl

Add <font size="+1"
in the line below (example shown)
<td class="letra12" align='left' colspan="2"><font size="+1"><b><a href="?menu={$MODULE_NAME}&amp;rawmode=yes&amp;action=csvdownload">{$ETIQUETA_DOWNLOAD} CSV&nbsp;&raquo;</a></b></tr>
This makes the DOWNLOAD CLIENTS link a little bigger in the window.

Also add CSV towards the end to help make it a little clearer


#############################################
make callback agent default screen  (CONFIRMED)
/var/www/html/themes/tenant/_common/index.tpl

find this section:

<><><><><><><><><><><><><
{$HEADER_MODULES}
    </head>
    <body leftmargin="0" topmargin="0" marginwidth="0" marginheight="0" "class="mainBody page-body" {$BODYPARAMS}>
    <div class="page-container">
<><><><><><><><><><><><><

Insert between:

<><><><><><><><><><><><><
{$HEADER_MODULES}

<script type='text/javascript'>
function checkTheBox()
{
document.getElementById("input_callback").click();
document.getElementById("input_callback").checked=true;
}
</script>

    </head>
<><><><><><><><><><><><><

Change next line and insert
onLoad="checkTheBox()"

    <body leftmargin="0" topmargin="0" marginwidth="0" marginheight="0" onLoad="checkTheBox()" class="mainBody page-body" {$BODYPARAMS}>
==============================
Login Screen - Bottom advertisement flag  (CONFIREMD)
/var/www/html/themes/tenant/_common/login.tpl
Remark/Delete out this line for a security concern.  Dont want people knowing what system we use.
<!-- <a href="http://www.issabel.org" style="text-decoration: none;" target='_blank'>IIssabel</a> is licensed under <a href="http://www.opensource.org/licenses/gpl-license.php" style="text-decoration: none;" target='_blank'>GPL</a>. 2006 - {$currentyear}.</div>-->
================================================================================================================
Normal Screen - Bottom Flag  (CONFIRMED)
/var/www/html/themes/tenant/_common/index.tpl
looks like
<a href="http://www.issabel.org" style="color: #444; text-decoration: none;" target='_blank'>Issabel</a> is licensed under <a href="http://www.opensource.org/licenses/gpl-license.php" target='_blank' style="color: #445; text-decoration: none;" >GPL</a>. 2006 - {$currentyear}.
Replace with this:
<style="color: #444; text-decoration: none;" target='_blank'>Contact Center</a>-<a href="" target='_blank' style="color: #445; text-decoration: none;" ></a> COMPANYNAME
===================================================================================================
MODIFY the LOGIN PAGE LOGO  (confirmed)

This is the reference file - changes it to the new name
The file is about 200x60 in size. 
sed -i -r 's/issabel_logo_mini.png/contactcenter_logo_mini.png/' /var/www/html/themes/tenant/_common/login.tpl
sed -i -r 's/alt="Issabel logo"/alt="ContactCenter Logo"/' /var/www/html/themes/tenant/_common/login.tpl

Put the new logo in
/themes/tenant/images/contactcenter_logo_mini.png


If you want a bigger image, the value below will double it will double it
sed -i -r 's/width="200"/width="400"/' /var/www/html/themes/tenant/_common/login.tpl
sed -i -r 's/height="62"/height="98"/' /var/www/html/themes/tenant/_common/login.tpl

or you can just make it use the default size of your imagine by modifyin this line in
<img src="{$WEBPATH}themes/{$THEMENAME}/images/contactcenter_logo_mini.png" width="400" height="98" alt="ContactCenter Logo" />
and just removed the WIDTH and HEIGHT portions
<img src="{$WEBPATH}themes/{$THEMENAME}/images/contactcenter_logo_mini.png"  alt="ContactCenter Logo" />

sed -i -r 's/width="400"//' /var/www/html/themes/tenant/_common/login.tpl
sed -i -r 's/height="62"/height="98"/' /var/www/html/themes/tenant/_common/login.tpl
=================================================================================
This is the logo in the upper left corner of the agent desktop  (Confirmed)

This is the code referencing it
admin/views/issabel_advice.php
themes/tenant/_common/_menu.tpl
issabel_warning_authentication.php

sed -i -r 's/issabel_logo_mini2.png/contactcenter_logo_mini2.png/' /var/www/html/admin/views/issabel_advice.php
sed -i -r 's/issabel_logo_mini2.png/contactcenter_logo_mini2.png/' /var/www/html/themes/tenant/_common/_menu.tpl
sed -i -r 's/issabel_logo_mini2.png/contactcenter_logo_mini2.png/' /var/www/html/issabel_warning_authentication.php

This is the file name and location
/themes/tenant/images/issabel_logo_mini2.png
UPdating with fille called "contactcenter_logo_mini2.png"

replace logos: delete these ones  (youc an use winscp)

./themes/tenant/images/issabel_logo_mini.png
./modules/registration/images/issabel_logo_mini.png

and upload these "contactcenter_logo_mini"
assuming changes above for file references

Delete these logs
./themes/tenant/images/issabel_logo_mini2.png
./images/issabel_logo_mini2.png

and upload the ones you want to replace assign
contactcenter_logo_mini2.png


Delete this file /modules/registration/images/issabel_logo_mini.png
sed -i -r 's/issabel_logo_mini.png/contactcenter_logo_mini.png/' /var/www/html/modules/registration/themes/default/_cloud_registered.tpl

##############################################################
vi /var/www/html/modules/registration/themes/default/_cloud_registered.tpl
Delete this line  <div class="cloud-footernote"><a href="http://www.issabel.org" style="text-decoration: none;" target='_blank'>Issabel</a> {$ISSABEL_LICENSED} <a href="http://www.opensource.org/licenses/gpl-license.php" style="text-decoration: none;" target='_blank'>GPL</a>. 2006 - {$currentyear}.</div>-->
==========================================================
verified

/var/www/html/favicon.ico 
This is the file that is in the tab.
Replace iwth you rown logo
##############################################
Increase the size of the AGENT color status bar.
sed -i -r 's/height: 1.3em;/height: 1.9em;/' /var/www/html//modules/agent_console/themes/default/css/issabel-callcenter.css
###############################################


===========================================
INFO button
themes/tenant/_common/_menu.tpl

<li><a href="http://www.issabel.org" target="_blank"><i class="fa fa-external-link"></i>Issabel WWebsite</a></li>
<li><a href="http://www.crm.com" target="_blank"><i class="fa fa-external-link"></i>CRM LInk</a></li>

themes/tenant/_common/index.tpl

<a href="http://www.issabel.org" style="text-decoration: none;" target='_blank'>Issabel</a> is licensed under <a href="http://www.opensource.org/licenses/gpl-license.php" style="text-decoration: none;" target='_blank'>GPL</a>. 2006 - {$currentyear}.</div>
<target='_blank'>Contact Center</a>

 vi themes/tenant/_common/login.tpl
<a href="http://www.issabel.org" style="text-decoration: none;" target='_blank'>Issabel</a> is licensed under <a href="http://www.opensource.org/licenses/gpl-license.php" style="text-decoration: none;" target='_blank'>GPL</a>. 2006 - {$currentyear}.</div>
<target='_blank'>Contact Center</a>
==========================================================================


/index.php   disabled the logout of the gui option until i can sort out how to logout of queue AND gui simultaneously
//if(isset($_GET['logout']) && $_GET['logout']=='yes') {
//    $user = isset($_SESSION['issabel_user'])?$_SESSION['issabel_user']:"unknown";
//    writeLOG("audit.log", "LOGOUT $user: Web Interface logout successful. Accepted logout for $user from $_SERVER[REMOTE_ADDR].");
//    session_destroy();
//   session_name("issabelSession");
//    session_start();
//    header("Location: index.php");
//    exit;
//}
=======================================================================
'title'                         =>  _tr('Agent Console').': '.
'title'                         =>  _tr('Engineer Console').': '.
================================================================================
hostnamectl set-hostname ysj-pbx-12
init 6
(system will reboot)

=========================================================
improtant

ORIGINAL CODE
#issabel-callcenter-llamada-paneles {
    position: relative;
    height: 32em;
    padding: 0;

Modified
#issabel-callcenter-llamada-paneles {
    position: relative;
    height: 532em;
    padding: 0;

This changes the actual "height of the agent control box window in relation to the main screen, it gives scroll bars but doesn't make the window bigger (yet)


This is the internal panel width for
themes/default/js/javascript.js
 $('#issabel-callcenter-llamada-paneles').layout({fxName: 'none', west: { size: 600 }});

This is the size of the SCRIPT panel, increasing this value decreases the information size
$('#issabel-callcenter-llamada-paneles-izq').layout({fxName: 'none', south: { size: 250 }});

    if ($('#issabel-callcenter-llamada-paneles').length > 0) {
        $('#issabel-callcenter-llamada-paneles').layout({fxName: 'none', west: { size: 400 }});
        $('#issabel-callcenter-llamada-paneles-izq').layout({fxName: 'none', south: { size: 200 }});
    }
#######################################################


confirmed
/var/www/html/modules/agent_console/index.php
alter these lines to add some spacess/adjustments for the agent console "INFORMATION screen" for "INTERNAL CALL ID".  It spreads out the data a little bit

        'TEXTO_CALL_ID'                 =>  $infoLlamada['calltype'].' - '.
            (isset($infoLlamada['campaign_id']) ? $infoLlamada['campaign_id'] : 'Que: '.$infoLlamada['queue']).' - '.
            (isset($infoLlamada['contact_id']) ? 'c'.$infoLlamada['contact_id'] : (isset($infoLlamada['callid']) ? $infoLlamada['callid'] : $infoLlamada['call_id'])),

something like :
Internal Call ID: incoming - 2 - 11
##################################################

confirmed but maybe incorporate into change already done by different sed
/var/www/html/themes/tenant/_common/login.tpl

<title>COMPANYNAME Contact Center {$PAGE_NAME}</title>
#######################
confirmed
$smarty->assign("PAGE_NAME", _tr('Login'));
/var/www/html/index.php


##########################
(reference info)
/var/www/html//modules/agent_console/themes/default/css/issabel-callcenter.css
This code adjusts the agent status bar.  You can make the phone bigger and the height of the actual status bar bigger etc.
In the code below i've increased the height to make the bar taller

#issabel-callcenter-estado-agente {
    position: relative;
    left: 0;
    width: 100%;
    height: 2.3em;
    padding: 0 0 0 0;
    font-size: 1.3em;
    color: #FFFFFF;
    font-weight: bold;
}
####################


Configuration Guide for using AudioCodes MP-114 with Asterisk 11

This was copy/pasted from another site, I didn't write this.  I just saved it in case the source was deleted.

In this post I’ll show how to get working an AudioCodes MP-114 with Asterisk 11: this device is an FXO unit with 4 ports.
Att.: The AudioCodes MP-114 utilizes an initialization text file with a .ini extension: this .ini file contains all the parameters that have been set by the WebUI, and something more. This file can be submitted to the device using WebGui (Maintenance -> Software Update -> Configuration File)
Asterisk sip trunk (sip.conf).
[1010]
disallow=all
type=friend
username=1010
fromuser=1010
secret=1010
context=from-trunk
qualify=yes
insecure=port,invite
host=dynamic
allow=alaw
allow=ulaw
directmedia=no
nat=no
t38pt_udptl=yes,redundancy,maxdatagram=400
jbenable=no
faxdetect=no

[1011]
disallow=all
type=friend
username=1011
fromuser=1011
secret=1011
context=from-trunk-sip-1011
qualify=yes
insecure=port,invite
host=dynamic
allow=alaw
allow=ulaw
directmedia=no
nat=no
t38pt_udptl=yes,redundancy,maxdatagram=400
jbenable=no
faxdetect=no

[1012]
disallow=all
type=friend
username=1012
fromuser=1012
secret=1012
context=from-trunk
qualify=yes
insecure=port,invite
host=dynamic
allow=alaw
allow=ulaw
directmedia=no
nat=no
t38pt_udptl=yes,redundancy,maxdatagram=400
jbenable=no
faxdetect=no

[1013]
disallow=all
type=friend
username=1013
fromuser=1013
secret=1013
context=from-trunk
qualify=yes
insecure=port,invite
host=dynamic
allow=alaw
allow=ulaw
directmedia=no
nat=no
t38pt_udptl=yes,redundancy,maxdatagram=400
jbenable=no
faxdetect=no
Att.: I prefer to configure 4 different trunks, each associated with a differente FXO.
Att.: The lines t38pt_udptl are to enable the T.38 to transimt & receive fax using this protocol.
AudioCodes MP-114 ini configration file
;**************
;** Ini File **
;**************
;Board: MP-114 FXO
;Serial Number: 3325133
;Slot Number: 1
;Software Version: 6.20A.022.003
;DSP Software Version: 204IM => 620.08
;Board IP Address: <device ip address>
;Board Subnet Mask: <subnet mask>
;Board Default Gateway: <Gateway>
;Ram size: 32M   Flash size: 8M 
;Num of DSP Cores: 1  Num DSP Channels: 4
;Profile: NONE 
;License Key limits aren't active full features capabilities are available !;
;----------------------------------------------

[SYSTEM Params]
DNSPriServerIP = 208.67.222.222
DNSSecServerIP = 8.8.8.8
SyslogServerIP = 10.1.1.89
NTPServerIP = 37.247.48.64
NTPServerUTCOffset = 3600
SSHServerEnable = 1

[BSP Params]

PCMLawSelect = 3
RoutingTableHopsCountColumn = 0, 0, 0, 0, 0, 0, 0, 0, 0, 0, 0, 0, 0, 0, 0, 0, 0, 0, 0, 0, 0, 0, 0, 0, 0

[Analog Params]
PolarityReversalType = 1
MinFlashHookTime = 100
CountryCoefficients = 66

[ControlProtocols Params]


[MGCP Params]


[MEGACO Params]
EP_Num_0 = 0
EP_Num_1 = 1
EP_Num_2 = 1
EP_Num_3 = 0
EP_Num_4 = 0

[Voice Engine Params]
CallProgressTonesFilename = 'usa_tones_13.dat'
FaxTransportMode = 0
V22ModemTransportType = 0
V23ModemTransportType = 0
V32ModemTransportType = 0
V34ModemTransportType = 0
RFC2833TxPayloadType = 101

[WEB Params]
LogoWidth = '145'
HTTPSCipherString = 'RC4:EXP'

[SIP Params]
MAXDIGITS = 3
ISREGISTERNEEDED = 1
ISTWOSTAGEDIAL = 0
DETFAXONANSWERTONE = 1
GWDEBUGLEVEL = 5
ENABLEEARLYMEDIA = 1
REGISTRARIP = '<asterisk pbx ip address>'
SIPGATEWAYNAME = '<asterisk pbx ip address>'
CNONCE = 'asterisk'
PASSWORD = ''
PRACKMODE = 0
DISCONNECTONBROKENCONNECTION = 0
ISFAXUSED = 1
SUBSCRIPTIONMODE = 1
GWREGISTRATIONNAME = '<asterisk pbx ip address>'
REGISTRARNAME = 'asterisk'

[IPsec Params]


[SNMP Params]


;
;  *** TABLE DspTemplates *** 
; This table contains hidden elements and will not be exposed.
; This table exists on board and will be saved during restarts 
;

;
;  *** TABLE PREFIX *** 
;  
;

[ PREFIX ]
FORMAT PREFIX_Index = PREFIX_DestinationPrefix, PREFIX_DestAddress, PREFIX_SourcePrefix, PREFIX_ProfileId, PREFIX_MeteringCode, PREFIX_DestPort, PREFIX_SrcIPGroupID, PREFIX_DestHostPrefix, PREFIX_DestIPGroupID, PREFIX_SrcHostPrefix, PREFIX_TransportType, PREFIX_SrcTrunkGroupID, PREFIX_DestSRD;
PREFIX 0 = *, <asterisk pbx ip address>, *, 0, 255, 5060, -1, , -1, , 0, -1, -1;

[ \PREFIX ]

;
;  *** TABLE CoderName *** 
; This table contains hidden elements and will not be exposed.
; This table exists on board and will be saved during restarts 
;

;
;  *** TABLE TrunkGroup *** 
;  
;

[ TrunkGroup ]
FORMAT TrunkGroup_Index = TrunkGroup_TrunkGroupNum, TrunkGroup_FirstTrunkId, TrunkGroup_FirstBChannel, TrunkGroup_LastBChannel, TrunkGroup_FirstPhoneNumber, TrunkGroup_ProfileId, TrunkGroup_LastTrunkId, TrunkGroup_Module;
TrunkGroup 0 = 1, 255, 1, 1, 1010, 0, 255, 255;
TrunkGroup 1 = 2, 255, 2, 2, 1011, 0, 255, 255;
TrunkGroup 2 = 3, 255, 3, 3, 1012, 0, 255, 255;
TrunkGroup 3 = 4, 255, 4, 4, 1013, 0, 255, 255;

[ \TrunkGroup ]

;
;  *** TABLE PstnPrefix *** 
;  
;

[ PstnPrefix ]
FORMAT PstnPrefix_Index = PstnPrefix_DestPrefix, PstnPrefix_TrunkGroupId, PstnPrefix_SourcePrefix, PstnPrefix_SourceAddress, PstnPrefix_ProfileId, PstnPrefix_SrcIPGroupID, PstnPrefix_DestHostPrefix, PstnPrefix_SrcHostPrefix;
PstnPrefix 0 = *, 1, *, 10.10.8.222, 0, -1, , ;
PstnPrefix 1 = *, 2, *, 10.10.8.222, 0, -1, , ;
PstnPrefix 2 = *, 3, *, 10.10.8.222, 0, -1, , ;
PstnPrefix 3 = *, 4, *, 10.10.8.222, 0, -1, , ;

[ \PstnPrefix ]

;
;  *** TABLE ProxyIp *** 
;  
;

[ ProxyIp ]
FORMAT ProxyIp_Index = ProxyIp_IpAddress, ProxyIp_TransportType, ProxyIp_ProxySetId;
ProxyIp 0 = <asterisk pbx ip address>, 0, 0;

[ \ProxyIp ]

;
;  *** TABLE TxDtmfOption *** 
;  
;

[ TxDtmfOption ]
FORMAT TxDtmfOption_Index = TxDtmfOption_Type;
TxDtmfOption 0 = 4;

[ \TxDtmfOption ]

;
;  *** TABLE TrunkGroupSettings *** 
;  
;

[ TrunkGroupSettings ]
FORMAT TrunkGroupSettings_Index = TrunkGroupSettings_TrunkGroupId, TrunkGroupSettings_ChannelSelectMode, TrunkGroupSettings_RegistrationMode, TrunkGroupSettings_GatewayName, TrunkGroupSettings_ContactUser, TrunkGroupSettings_ServingIPGroup, TrunkGroupSettings_MWIInterrogationType;
TrunkGroupSettings 0 = 1, 1, 0, , , -1, 255;
TrunkGroupSettings 1 = 2, 1, 0, , , -1, 255;
TrunkGroupSettings 2 = 3, 1, 0, , , -1, 255;
TrunkGroupSettings 3 = 4, 1, 0, , , -1, 255;

[ \TrunkGroupSettings ]

;
;  *** TABLE TargetOfChannel *** 
;  
;

[ TargetOfChannel ]
FORMAT TargetOfChannel_Index = TargetOfChannel_Destination, TargetOfChannel_Type, TargetOfChannel_HotLineToneDuration;
TargetOfChannel 0 = 1010, 1, -1;
TargetOfChannel 1 = 1011, 1, -1;
TargetOfChannel 2 = 1012, 1, -1;
TargetOfChannel 3 = 1013, 1, -1;

[ \TargetOfChannel ]

;
;  *** TABLE Authentication *** 
;  
;

[ Authentication ]
FORMAT Authentication_Index = Authentication_UserId, Authentication_UserPassword;
Authentication 0 = 1010, *;
Authentication 1 = 1011, *;
Authentication 2 = 1012, *;
Authentication 3 = 1013, *;

[ \Authentication ]

;
;  *** TABLE ProxySet *** 
;  
;

[ ProxySet ]
FORMAT ProxySet_Index = ProxySet_EnableProxyKeepAlive, ProxySet_ProxyKeepAliveTime, ProxySet_ProxyLoadBalancingMethod, ProxySet_IsProxyHotSwap, ProxySet_SRD, ProxySet_ClassificationInput, ProxySet_ProxyRedundancyMode;
ProxySet 0 = 1, 60, 0, 0, 0, 0, -1;

[ \ProxySet ]

;
;  *** TABLE CodersGroup0 *** 
;  
;

[ CodersGroup0 ]
FORMAT CodersGroup0_Index = CodersGroup0_Name, CodersGroup0_pTime, CodersGroup0_rate, CodersGroup0_PayloadType, CodersGroup0_Sce;
CodersGroup0 0 = g711Alaw64k, 20, 0, -1, 0;
CodersGroup0 1 = g711Ulaw64k, 20, 0, -1, 0;

[ \CodersGroup0 ]
Email, RSS

SIP Trunk between Avaya IP Office and Asterisk

I got this from another site, i didn't write this, just copy/pasted as reference in case it disappeared

SIP Trunk between Avaya IP Office and Asterisk

In this post I’ll show how to create a Sip trunk between Avaya IP Office and Asterisk pbx.
Avaya IP Office Side
a) Enable SIP Trunks in System Configuration (System – LAN1 – VOIP)
b) Create a new SIP Trunk
-- SIP Line
ITSP Domain Name: <empty>
In Service: Y
Eveything Else: <default>

-- Transport
ITSP Proxy Address:
Layer 4 Protocol: UDP
Send Port: 5060
Use Network Topolgy Info: LAN1
Eveything Else: <default>
Att.: SIP Licenses are required for this step.
--SIP Credential
Add a new SIP Credential as below.
UserName: <SIP Extension's username on Asterisk for Avaya IpOffice>
Authentication Name: <SIP Extension's username on Asterisk for Avaya IpOffice>
Contact: <SIP Extension's username on Asterisk for Avaya IpOffice>
Password: <SIP Extension's password on Asterisk for Avaya IpOffice>
Expiry: 60
Registration Required: Y

-- SIP URI
Add a new channel as below.
Local URI: Use internal Data
Contact: Use internal Data
Display Name: Use internal Data
PAI: Use internal Data
Registration: <Index of set in SIP credential>
Incoming Group : <Make sure to set the groups to something unique.>
Outgoing Group : <same as Incoming group>
c) Under Each User, under there SIP Tabs make sure to set their Sip Name and extension number.
d) Create an Incoming Call Route
Bearer: Any Voice
Line Group : <Value from SIP URI>
Eveything Else: <default>

Destination Tab
Default Value is . (just a period)
e) Short code for calling the Asterisk Box. The extension on my asterisks are 8xx.
So my short code codec looks like the next.
Code: 8XX  ( Change this with your extension format )
Feature: Dial 3k1
Tel Number: 8N”@<Asterisk Ip Address>” (Replace with IP of asterisks)
Line Group : <Group Id Set in SIP URI Tab>
Asterisk side
a) Create a SIP Trunk that looks like this:
Trunk Name: <SIP Extension's username on Asterisk for Avaya IpOffice>
Peer Details:

type=friend
username=<SIP Extension's username on Asterisk for Avaya IpOffice>
fromuser=<SIP Extension's username on Asterisk for Avaya IpOffice>
secret=<SIP Extension's password on Asterisk for Avaya IpOffice>
context=from-trunk-sip
qualify=yes
insecure=very
canreinvite=no
host=dynamic
disallow=all
allow=alaw&ulaw
b) Create an Outbound Route
Route name: IPOffice
Intra Company Route <checked>
Dial Patterns : 6XX  <Replace with the format of your IP Office extension>

Trunk Sequence: <Select the trunk you created above>
Linkografia

Microsoft Endpoint Manager MDM push certificate for IOS devices

This doc as a reference only:  May not apply to you or your organization.

 This is where you go to update your MDM push cert.


Here's how to enroll an IOS device:  This is only a high level guide.  It may not apply to your organization.  This was posted as some help for users encountering an issue

You may not be prompted with every screen shown; it will be dependent on the phone version and your current signed in credentials.  Some screens maybe skipped by the system.  If you run into any questions or issues, please reach out to operations group for further assistance.


The next couple of steps, for this example, are if there is an existing mobile device management already there, with the assumption that it no longer works, likely due to cert expiration.  If this doesn't apply, skip down a few lines to the part that starts with "1."

Go to the iphone settings 


Select GENERAL

 Select VPN * Device Management

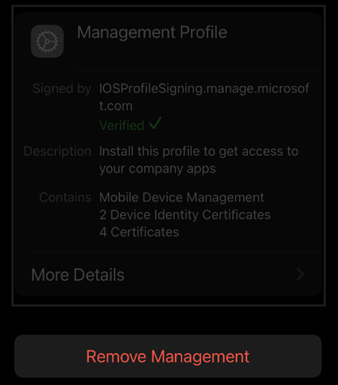
If you have an existing “MOBILE DEVICE MANAGEMENT” entry, click on the arrow to the right

Select “REMOVE MANAGEMENT” 


You will be prompted to entire in your iphone passcode


1. Select the Comp Portal Application

You should be able to search for “Comp Portal” app if it isn’t appearing.

Once selected

Loading company resources” will appear, may take a few minutes  

Click on Sign In  

Enter in your corporate email name (if prompted)

Select NEXT  

12. Enter in your email password

Select NEXT  

Select BEGIN on the "Set UP [company] access" screen

14. On the next screen, “Device management and your privacy” 

Select CONTINUE  

15. Review privacy information

Select CONTINUE  

16. Your system will review your phone and present you with the following screen prompt:

Select ALLOW

17. You may get a pop up that the profile has been downloaded.  

Select CLOSE if prompted.

18. Once downloaded, 

you will be prompted to “CONTINUE  

19. Select Continue when prompted after the “Download management profile” is completed  

20. Go to the phone settings (older iPhone press the home button, newer phones swipe up)

21. Click on the settings ICON

22. Select GENERAL

23. Select VPN * Device Management

25. Select “Management PROFILE

26. Select INSTALL

27. Select DONE 

28. Go BACK to the Comp Portal app

(press the HOME button or swipe up to select other application)

29. Select CONTINUE

30. Then select DONE

31. Teams and Outlook should be restored