Wednesday, February 19, 2025

Simple OBS Replay using built in features

Uses everything built into OBS, no scripts.  You can probably configure this in just a few minutes.

It will replay what is on your program feed, suitable for a single camera shoot where you want to have some sort of replay.

For more advanced replay setup, check out these two links

Random Contributions: OBS Replay using Source Record (1 Camera
Random Contributions: OBS Replay using Source Record (2+ Cameras)

DESCRIPTION:

Press a button to set an OUT point
Press a second button, goes back X seconds (replay buffer as you set) from OUT point, replaying at speed you set.

HOW TO:

1>    
Settings -> OUTPUT -> 
"Output Mode" -> Advanced


2>
Enable Replay Buffer.  Set for 10 seconds


3>
SETTINGS -> ADVANCED -> Recording

READ THIS CAREFULLY.  This is a spot that trips up configuration

By default, the settings "Filename Formatting" is set as:  %CCYY-%MM-%DD %hh-%mm-%ss

Replace with the word "Recording"


Click on "APPLY"

Please note.  If you record your stream, it will not timestamp that recording as default in the filename.  It will now just add a (X) after the name for each recoding.  This is necessary for the replay.

4>
HOTKEYS -> REPLAY BUFFER -> SAVE REPLAY

Set it for F9


Click Apply
Click "OK"

6>
Select "START REPLAY BUFFER"

    IF you get this pop up, just select YES


7>
Press your hotkey, "F9".  

The lower left of the OBS should give an indication if and where the recording is saved. 

8>
Create a new scene called "Instant Replay"
This is the scene that is triggered press the replay during a show.

9>
Set up a Media Source
This example its called "ReplayScene"


10>
Select browse and go to the location your replay is saved 


Select the file "Replay Recording" and click "OK"

11>  Make the following changes:

Disable "LOOP"
Enable "Restart playback when the source becomes active"
Disable "Show nothing when playback ends" (this is a personal preference.  with this disabled, and you come to the end of the 10 seconds, the video will pause automatically.   If enabled, a black screen appears.

-This is very important-
Enable "Close file when inactive" (if enabled it can lock the recording file out)

Speed = Whatever you like.  I set mine to 70%. This means the playback will be slower, playing 70% of a normal rate being 100%.


HINT - You could add an additional text box in this sources window and put "REPLAY" in the corner if you want your viewers to know.

12>
Click on OK


15>
SETTINGS - HOTKEYS

Find the scene name you created, in our example it was called "Instant Replay"

This example has it set to F12


17>
NOTE: this replay records the PROGRAM output. Whatever was on your program window during the buffer time frame that you were recording will play back.

For the purposes of this demo, I've created a scene with a video to test with.


Now lets test it out!

OBS replay is going to record whatever is on your PROGRAM window.

So, make sure you have some video in that window that is moving so that you have a reference.
Make sure that your replay buffer is recording.

Now wait 10 seconds so that the replay buffer is full.

Press "F9"  - This sets an OUTpoint

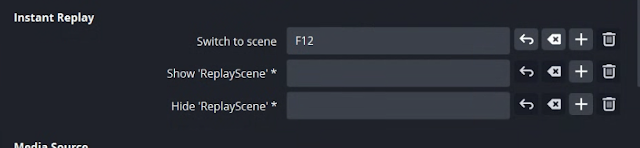
Press "F12" - This says "go back to the beginning of the replay" 
You would press this when you are ready to show the replay.

Now make your "InstantReplay" scene live in program.  It should start playing automatically.

(To make the playback/show on program happen simultaneously make F12 a CUT short cut as well in your hotkeys and it will do it all at once)


You should now see the 10 seconds that was saved playback, at 70% speed. 

When its done it will freeze, and you cut back to whatever camera you want.


One additional step.  When you are running a replay, it will play back the sound that was live as well.  So, turn down/mute your Audio Media Source during a replay.  Else you will hear program audio replay...sometimes at a really slow sounding speed.


Monday, February 3, 2025

Sending commands to OBS using WebSockets

Send commands to Websockets using OBScommander

I'm using "Nutty's Official OBS Commander - NOOBS CMDR"  

This program will create .bat file that, upon execution, would allow you to control elements of another OBS instance (or on the same machine just via bat files).  

In my example I have 2 OBS instances, the first one is capturing a hockey game then sending the video to a second OBS instance which putting on the scoreboard graphics.

When the first OBS goes into replay, I want to clear the graphic, so I tell the second OBS to go from scene "Game" to scene "Replay" which are identical, except the Replay scene has no graphics.

1: First turn on websockets on the graphics OBS, set a password.  I used "Password20"


2.  I setup two scenes
    
One is called "Game" and this is the normal game.  Which contains the HDMI input from the switcher and the graphics overlay

The second one is called "Replay" which doesn't have any graphics, just the HDMI input


I created 2 .BAT files that looked like this on my computer capturing the hockey game.  By double clicking on these bat files, I could set my graphics on and off.

graphic-off.bat contained

OBSCommand.exe /server=IPofGraphicsOBS:4455 /password="Password20" /scene="Replay"

graphic-on.bat   contains this:

OBSCommand.exe /server=IPofGraphicsOBS:4455 /password="Password20" /scene="Game"


Now the OBS instance capturing the hockey game, Advanced Scene Switcher was installed.

This program can automate numerous tasks within OBS, and in this case, when the REPLAY hotkey (F9) is pressed, it watches for that button to be pressed and runs the file "graphic-off".  When the replay is done, the hotkey is pressed (F12) and AdvSS runs "graphic-on" file which tells the graphics OBS to switch to the scene "game"

Once you install it, go into that OBS instance and we'll configure it.  On my switcher I have 2 camera inputs and a Replay input from our instant replay machine.


I started up Advanced Scene Switcher to make it active


On the Macro tab I created a new macro, and this is what the configuration is:

The first macro, when it detects that the "Instant Replay" scene is live, will run the "graphics-off.bat" file, which will tell the graphics computer to switch to the scene with no graphics.


Then created a second one, this time we select "IF NOT" in the first section.
This says, "if the active output is NOT instant replay, send a command to turn the graphics back on."


Now you can toggle back and forth between your scenes and graphics will turn on and off.


Friday, January 31, 2025

OBS Websockets and Advanced Scene Switcher

WEBSOCKETS - 


There doesn't really seem to be a lot of information on how this thing works with its command structure.  Not that this document is any better, but I'll put what I know to make this work.

For relevance, the examples below are using two computers with an instance of OBS on each one.
OBS 1 is the "switcher" sending video, and Websocket commands, to OBS 2 "graphics machine" to start recording.

We will be using Advanced Scene Switcher plugin.

Steps:

Activate Websockets in your Second OBS.    

Set a password and check the enable box.


I wont dive into ADVanced Scene Switcher here, but in your macro, you select Websocket, select "OBS websocket Message".  This plugin is only required on the sending computer.

To establish the initial connection to the machine running websockets, 
select the gear icon 
You create a name for this connection, and enter in the IP, port and password of the machine.


Here's an example of a json message in the websocket OBS window

Example Script
This will let you turn recording on/off


{

"d":

{

"requestData": {},

"requestId": "",

"requestType": "ToggleRecord"

},

"op": 6

}


The Code syntax for the following commands is as below

{

"d":

{

"requestData": {},

"requestId": "",

"requestType": "XXXXX"

},

"op": 6

}


You can substitute the XXXXX with some of the following examples:

StartRecord

StopRecrod

ToggleRecord

StartReplayBuffer

StopReplayBuffer

SaveReplayBuffer

StartVirtualCam

StopVirtualCam

ToggleVirtualCam


Heres some other commands.  Use this syntax


This will let you change the scene of a remote OBS.  
The command is "SetCurrentProgramScene"

But substitute "XXXXX" for your Scene Name

{

"op": 6,

"d":

{

"requestType": "SetCurrentProgramScene",

"requestId": "2",

"requestData":

{

"sceneName": "XXXXXX"

}

}

}


Here's some other commands:

YYYYYY / XXXXX

CreateScene / SceneNameYouWant

RemoveScene / SceneName


{

"op": 6,

"d":

{

"requestType": "YYYYYYY",

"requestId": "2",

"requestData":

{

"sceneName": "XXXXXX"

}

}

}


Here's some other commands:

YYYYYY / XXXXX / ZZZZZZ

SetSceneName / OldName / NewName


{

"op": 6,

"d":

{

"requestType": "YYYYYY",

"requestId": "2",

"requestData":

{

"sceneName": "XXXXXX",

"newSceneName":"ZZZZZZ"

}

}

}


TriggerHotkeyByName


Here's what they dont tell you about this command, you need to preface the transition name with " OBSBasic."  

So to use transition, you need to have "OBSBasic.Transistion"


{

"d": {

"requestData": {

"hotkeyName": "OBSBasic.Transition"

},

"requestId": "24",

"requestType": "TriggerHotkeyByName"

},

"op": 6

}


Here are some of the Hotkey Names

PTZ.PanTiltUpLeft PTZ.Save15

PTZ.PanTiltLeft         PTZ.Recall16

PTZ.PanTiltDownLeft PTZ.Save16

PTZ.PanTiltUpRight ReplayBuffer.Save

PTZ.PanTiltRight         OBSBasic.StartStreaming

PTZ.PanTiltDownRight OBSBasic.StopStreaming

PTZ.PanTiltUp         OBSBasic.ForceStopStreaming

PTZ.PanTiltDown OBSBasic.StartRecording

PTZ.ZoomWide         OBSBasic.StopRecording

PTZ.ZoomTele         OBSBasic.PauseRecording

PTZ.FocusAutoFocus OBSBasic.UnpauseRecording

PTZ.FocusNear         OBSBasic.SplitFile

PTZ.FocusFar         OBSBasic.AddChapterMarker

PTZ.FocusOneTouch OBSBasic.StartReplayBuffer

PTZ.SelectPrev         OBSBasic.StopReplayBuffer

PTZ.SelectNext         OBSBasic.StartVirtualCam

PTZ.ActionDisableLiveMovesToggle OBSBasic.StopVirtualCam

PTZ.ActionFollowPreviewToggle OBSBasic.EnablePreview

PTZ.ActionFollowProgramToggle OBSBasic.DisablePreview

PTZ.Recall1 OBSBasic.EnablePreviewProgram

PTZ.Save1 OBSBasic.DisablePreviewProgram

PTZ.Recall2 OBSBasic.ShowContextBar

PTZ.Save2 OBSBasic.HideContextBar

PTZ.Recall3 OBSBasic.Transition

PTZ.Save3 OBSBasic.ResetStats

PTZ.Recall4 OBSBasic.Screenshot

PTZ.Save4 OBSBasic.SelectedSourceScreenshot

PTZ.Recall5 OBSBasic.SelectScene

PTZ.Save5 OBSBasic.SelectScene

PTZ.Recall6 OBSBasic.QuickTransition.15

PTZ.Save6 OBSBasic.QuickTransition.16

PTZ.Recall7 OBSBasic.QuickTransition.17

PTZ.Save7 Hide on DSK 1

PTZ.Recall8 Enable Tie DSK 1

PTZ.Save8 Disable Tie DSK 1

PTZ.Recall9 startSwitcherHotkey

PTZ.Save9 stopSwitcherHotkey

PTZ.Recall10 startStopToggleSwitcherHotkey

PTZ.Save10 upMacroSegmentSwitcherHotkey

PTZ.Recall11 downMacroSegmentSwitcherHotkey

PTZ.Save11 removeMacroSegmentSwitcherHotkey

PTZ.Recall12 OBSBasic.SelectScene

PTZ.Save12

PTZ.Recall13

PTZ.Save13

PTZ.Recall14

PTZ.Save14

PTZ.Recall15


SetPersistenData

Into the global one, set the name as TestSlot and put in a value of 5


{

"d": {

"requestData": {

"realm": "OBS_WEBSOCKET_DATA_REALM_GLOBAL",

"slotName": "TestSlot",

"slotValue": "5"

},

"requestId": "31",

"requestType": "SetPersistentData"

},

"op": 6

}


Read that data
{
"d": {
"requestData": {
"realm": "OBS_WEBSOCKET_DATA_REALM_GLOBAL",
"slotName": "TestSlot"
},
"requestId": "32",
"requestType": "GetPersistentData"
},
"op": 6
}


You can verify that a connection is happening if you look at the Websockets config page on your receiving machine.  You should see some references to the IP of your source computer


Here's a link to the github site with all the commands that you could potentially use.

obs-websocket/docs/generated/protocol.md at master · obsproject/obs-websocket · GitHub


WebSocket client disconnect code


UnknownReason = 4000,


The server was unable to decode the incoming websocket message

MessageDecodeError = 4001,

// The specified `messageType` was invalid

UnknownMessageType = 4002,

// The client sent a websocket message without first sending `Identify` message

NotIdentified = 4003,

// The client sent an `Identify` message while already identified

AlreadyIdentified = 4004,

// The authentication attempt (via `Identify`) failed

AuthenticationFailed = 4005,

// There was an invalid parameter the client's `Identify` message

InvalidIdentifyParameter = 4006,

// A `Request` or `RequestBatch` was missing its `requestId`

RequestMissingRequestId = 4007,

// The websocket session has been invalidated by the obs-websocket server.

SessionInvalidated = 4008,

// The server detected the usage of an old version of the obs-websocket protocol.

UnsupportedProtocolVersion = 4009,


Monday, January 20, 2025

IIS upload file size

 "The page was not displayed because the request entity is too large"

Having an issue with uploading larger files to your IIS site?  There are a few posts about modifying the webapps/manager/web-info/web.xml in tomcat etc.

But this fixed my issue

Launch IIS Manager

Double click on your "Default Web Site" in the connections window
double click on "Request Filtering"
on the right side select "Edit Feature Settings"

Then in "Request limits" set the byte count for the max size you want to upload in the 
"maximum allowed content length"


If this tutorial has been of any help to you, I'd love to know! 
If you have suggestions of how to improve it, let me know in the comments!  Thanks!

Wednesday, September 18, 2024

Setup FreePBX (AND Asterisk) in AZURE

This pretty much will work for any deployment I guess, but this is specifically written for AZURE, so there might be some tweaks in here that are specific for that environment.  This deployment was done via a Windows 10 machine.


In Azure, create a new virtual machine.

In my example i'm using a "PAY AS YOU GO" approach and have assigned it to a group called pbxtest1


I assigned it a virtual machine name and region


At time of writing this, the FreePBX deployment recommends Debian 12 "Bookworm"

Assign it with the appropriate CPU and RAM that you will need.  For testing, I'm using a minimal system


I'm leaving everything else default.  Select Review and Create

Select "CREATE" on the subsequent page, then you will be prompted "Generate new key Pair"

Download the private key


Your system should download the key file


Azure should start building your deployment


That will only take a few minutes to create normally.

Select "Go To Resource"


Note the IP address assigned to your instance


If you haven't already, install PUTTY from putty.org


Launch the APP " PuttyGEN


Select "CONVERSION" -> IMPORT KEY


Select the key file that you downloaded upon creation of the machine


Now select "FILE" -> "Save Private Key"


You'll get a PuttyGen warning about saving it without a passphrase, select YES


Give it a name and select SAVE


You can close the PuttyGEN app

Now open a regular PUTTY session


Enter in the IP provided to you by Azure.  Give it a name under "Saved Sessions"


Select "SSH" -> Auth -> Credentials to Authenticate with


In the Public-key authentication select  BROWSE and open up the key file you generated in PuttyGen


Scroll back up to "SESSION" then click on "SAVE

Now open your saved session.  If it works, you should get prompted with the similar security warning


Select "ACCEPT"

Logon with the default user " azureuser "

Should be prompted with something like this:


Lets update the system first (will take a few minutes depending on network and guest speed

sudo apt update && sudo apt upgrade -y

Now run the following to enter ROOT

sudo -i

Get the latest updates 

#################################################################################

The following command will install the latest release of FreePBX (at time of writing version 17) and the lastest GA of Aasterisk

cd /tmp

wget https://github.com/FreePBX/sng_freepbx_debian_install/raw/master/sng_freepbx_debian_install.sh  -O /tmp/sng_freepbx_debian_install.sh

bash /tmp/sng_freepbx_debian_install.sh

The script will now do a full install of all the necessary items to get FreePBX and Asterisk up and running.  Will take about 30 minutes

Will be something like this as you wait..

When all said and done, assuming no installation issues, you should be presented with this screen similar.


Goto your guest network settings:  
select "Create Port Rule"
then select InBound Port Rule

Create a rule with the service as HTTP.  You can use all the other default settings


Click on ADD

You should now be able to HTTP to the WAN IP that you used to SSH to the box.

And be presented with a screen like this:


Fill in the user name and email address that you want to logon to the system with and receive system status message in the future.

You have to change the System Identification name from the default provide to something new to continue.


If this tutorial has been of any help to you, I'd love to know! 
If you have suggestions of how to improve it, let me know in the comments!  Thanks!