Install vTIGER710 on CENTO 7 server minimal
Tested on a standard deployment of CENTOS 7 minimal build 1810 (in HyperV environment)
Assumptions:
Deployment of CENTOS 7 minimal build 1810 has been completed with root access to your server via SSH session.
Deployment below is based on a fully updated OS available (as of January 2019)
Copy/Paste the commands in BOLD. Submit them one at a time, waiting for each action to complete.
If you already have Database, Apache and PHP installed, you can skip down to the install Vtiger setup, however additional or modified installation requirements for your system may need to be researched by you for a successful install.
UPDATE BOX
Install PHPmyadmin (handy if editing SQL data in vtiger)

Edit the file
Change "Cookie" to "HTTP"
shutdown -r now
server reboots....
from a webbrowser on another networked computer:
http://IPaddress/vtigercrm
You should be presented with the Vtiger setup screen like this one
Tested on a standard deployment of CENTOS 7 minimal build 1810 (in HyperV environment)
Assumptions:
Deployment of CENTOS 7 minimal build 1810 has been completed with root access to your server via SSH session.
Deployment below is based on a fully updated OS available (as of January 2019)
Copy/Paste the commands in BOLD. Submit them one at a time, waiting for each action to complete.
If you already have Database, Apache and PHP installed, you can skip down to the install Vtiger setup, however additional or modified installation requirements for your system may need to be researched by you for a successful install.
UPDATE BOX
yum -y updateINSTALL MARIADB (aka MySQL)
rpm --import /etc/pki/rpm-gpg/RPM-GPG-KEY*
yum -y install epel-release
yum -y install mariadb-server mariadb
systemctl start mariadb.service
systemctl enable mariadb.service
mysql_secure_installationINSTALL APACHE
"enter for none"
SET ROOT PASSWORD = Y
Remove anonymous users= Y
Disallow root login remotely = Y
Remove test database and access to it? = Y
Reload privilege tables now = Y
yum -y install httpd
systemctl start httpd.service
systemctl enable httpd.service
rpm -Uvh http://rpms.remirepo.net/enterprise/remi-release-7.rpm
yum -y install yum-utilsINSTALL PHP
yum -y install php
systemctl restart httpd.service
yum -y install php-gd php-ldap php-odbc php-pear php-xml php-xmlrpc php-mbstring php-soap curl curl-devel php-imap php-mysqlnd php-pdo
systemctl restart httpd.service
Install PHPmyadmin (handy if editing SQL data in vtiger)
yum -y install phpMyAdminEdit the file
/etc/httpd/conf.d/phpMyAdmin.confFIND THIS
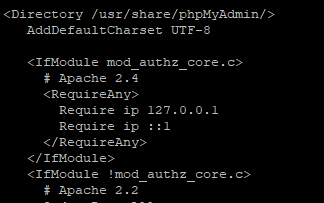
MAKE IT LOOK LIKE THIS

/etc/phpMyAdmin/config.inc.php
systemctl restart httpd.serviceAdd entries into firewall
firewall-cmd --permanent --zone=public --add-service=http
firewall-cmd --permanent --zone=public --add-service=https
firewall-cmd --reload
Install vTIGER 7.1.0
yum -y install wget
cd /tmp
wget https://sourceforge.net/projects/vtigercrm/files/vtiger%20CRM%207.1.0/Core%20Product/vtigercrm7.1.0.tar.gz
tar -xzvf vtigercrm7.1.0.tar.gz
mv vtigercrm /var/www/html/
chown -R apache:apache /var/www/html
sed -i -r 's/display_errors = Off/display_errors = On/' /etc/php.ini
sed -i -r 's/log_errors = On/log_errors = Off/' /etc/php.ini
sed -i -r 's/memory_limit = 128M/memory_limit = 256M/' /etc/php.ini
sed -i -r 's/max_execution_time = 30/max_execution_time = 0/' /etc/php.ini
sed -i -r 's/short_open_tag = On/short_open_tag = Off/' /etc/php.ini
sed -i -r 's/SELINUX=enforcing/SELINUX=disabled/' /etc/selinux/config
mysql -u root -pEnter in MYSQL password
CREATE DATABASE vtiger710;
CREATE USER 'vtiger_admin'@'localhost' IDENTIFIED BY 'PaSsw0rd';
GRANT ALL PRIVILEGES ON `vtiger710`.* TO 'vtiger_admin'@'localhost';
FLUSH PRIVILEGES;
ALTER DATABASE vtiger710 CHARACTER SET utf8 COLLATE utf8_general_ci;
EXIT(reboot server and test!)
shutdown -r now
server reboots....
from a webbrowser on another networked computer:
http://IPaddress/vtigercrm
You should be presented with the Vtiger setup screen like this one

Select INSTALL
Click I AGREE if you agree with the licence
Screen will show you Installation Pre-req.
Error_reporting will be in red with NOT RECOMMENDED.
Never been able to sort this, but have a bunch of vtiger installations and never had a problem. Just continue
SYSTEM CONFIGURATION
Hostname = localhost
username = vtiger_admin
password = PaSsw0rd
database name = vtiger710
Select "CREATE NEW DATABASE"put in your MariaDB user/password (root/Password)
Pick the currency of your countryVtiger admin userUser name - defaults to admin
password = password of your choice
First Name is optional
Last Name = Administrator
email = your email address for admin messages.
Select time zone
Press NEXTAssuming you have everything configured properly you'll be presented with a summary screen of config settings.
Press NEXTSelect your type of company.
This is strictly for anonymous info for vtiger.
Click on NEXT
The system will start doing installations of the application. you'll see a status bar moving around. Usually only takes a minute or two. Depends on speed of your system. Just be patient (i've seen it take 5 minutes)
The system will then present you some check boxes of the type of business you are running and additional modules that are custom to your environment. Once the installation is completed, you will be at the vTiger admin window and your installation is completed.
You'll be presented with a "ALMOST THERE" menu. Its double checking your preferences.
You'll be presented with a "ALMOST THERE" menu. Its double checking your preferences.
Select "GET STARTED"You should now be in the VTIGER dashboard
No comments:
Post a Comment
Feel free to leave a comment! If you have any information that you think should be included, please do so here and I'll get it added in.