Uses everything built into OBS, no scripts.
It will replay what is on your program feed, suitable for a single camera shoot where you want to have some sort of replay.
For more advanced replay setup, check out these two links
Random Contributions: OBS Replay using Source Record (1 Camera
Random Contributions: OBS Replay using Source Record (2+ Cameras)
DESCRIPTION:
Press a button to set an OUT point
Press a second button, goes back X seconds (replay buffer as you set) from OUT point, replaying at speed you set.
HOW TO:
1>
Settings -> OUTPUT -> "Output Mode" -> Advanced
2>
Enable Replay Buffer. Set for 10 seconds
3>SETTINGS -> ADVANCED ->
RecordingREAD THIS CAREFULLY. This is a spot that trips up configuration
By default, the settings "Filename Formatting" is set as: %CCYY-%MM-%DD %hh-%mm-%ss
Replace with the word "Recording"
Click on "APPLY"
Please note. If you record your stream, it will not timestamp that recording as default in the filename. It will now just add a (X) after the name for each recoding. This is necessary for the replay.
4>
HOTKEYS -> REPLAY BUFFER -> SAVE REPLAY
Set it for F9
Click Apply
Click "OK"
6>
Select "START REPLAY BUFFER"
IF you get this pop up, just select YES
7>
Press your hotkey, "F9".
The lower left of the OBS should give an indication if and where the recording is saved.
8>
Create a new scene called "Instant Replay"
This is the scene that is triggered press the replay during a show.
9>
Set up a Media Source
This example its called "ReplayScene"
10>
Select browse and go to the location your replay is saved

Select the file "
Replay Recording" and click "
OK"
11> Make the following changes:
Disable "LOOP"
Enable "Restart playback when the source becomes active"
Disable "Show nothing when playback ends" (this is a personal preference. with this disabled, and you come to the end of the 10 seconds, the video will pause automatically. If enabled, a black screen appears.
-This is very important-
Enable "Close file when inactive" (if enabled it can lock the recording file out)
Speed = Whatever you like. I set mine to 70%. This means the playback will be slower, playing 70% of a normal rate being 100%.
HINT - You could add an additional text box in this sources window and put "REPLAY" in the corner if you want your viewers to know.
12>
Click on OK
15>
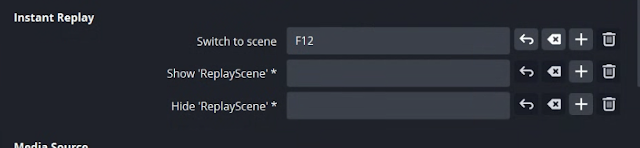
SETTINGS - HOTKEYS
Find the scene name you created, in our example it was called "Instant Replay"
This example has it set to F12
17>
NOTE: this replay records the PROGRAM output. Whatever was on your program window during the buffer time frame that you were recording will play back.
For the purposes of this demo, I've created a scene with a video to test with.
Now lets test it out!
OBS replay is going to record whatever is on your PROGRAM window.
So, make sure you have some video in that window that is moving so that you have a reference.
Make sure that your replay buffer is recording.
Now wait 10 seconds so that the replay buffer is full.
Press "F9" - This sets an OUTpoint
Press "F12" - This says "go back to the beginning of the replay"
You would press this when you are ready to show the replay.
Now make your "InstantReplay" scene live in program. It should start playing automatically.
(To make the playback/show on program happen simultaneously make F12 a CUT short cut as well in your hotkeys and it will do it all at once)
You should now see the 10 seconds that was saved playback, at 70% speed.
When its done it will freeze, and you cut back to whatever camera you want.
One additional step. When you are running a replay, it will play back the sound that was live as well. So, turn down/mute your Audio Media Source during a replay. Else you will hear program audio replay...sometimes at a really slow sounding speed.
If this tutorial has been of any help to you, I'd love to know! If you have suggestions of how to improve it, let me know in the comments! Thanks!